Friday, December 21, 2012

Christmas cards 2012

Well my crafty friends, I am still here. Between dealing with the nerve pain, finishing Christmas cards & presents, and the FLU...I have not been able to post in three weeks. Feels like forever.
I have had so many cute ideas and my body just would not cooperate. Oh well, that just means more projects for next year, right. LOL

I started making my Christmas cards months ago. Sadly when I start early I seldom finish early because I just keep adding more and more crafty goodness right up to the deadline to deliver it. LOL ...I just can't help it. My mind just keeps thinking of extra little things to add.

Well here is a look at my Christmas card for 2012. It may not look like it at first, but there are several steps to this card.


The card base is a piece of 8 1/2 by 11 inches white card stock that is folded in half. The edges are inked by blending Faded Jeans onto the card.
Next is a mat cut at 5 1/4 by 8 1/4 and edged in Fired Brick Distress Ink. 

The next layer is 5 inch by 8 inch white card stock ...Yes, white! I blended Peacock Feathers, Broken China, Stormy Sky, and Faded Jeans onto it then stamped snowflakes onto my background with each of the colors I just mentioned.


 But wait...I did not stop there...
On top of all that, I stamped more snowflakes with Staz-on and dusted Perfect Pearls over the entire surface. The powder adheres to the Staz-on to make beautiful shimmery white/silver snowflakes and adds a subtle glimmer to the rest of the background. I misted the paper with water to activate the binders in the Perfect Pearls.

The reindeer was cut from brown cardstock with one of my own cut files. It was embossed and covered with German Silver Gilder's Paste. I added a tiny dot of red Stickles to the nose. :)


Now for the layers at the bottom. 
I tore the edges of each layer. The vellum layer got embossed. The middle layer got smeared with Stickels. The last layer is Core-dinations that I embossed and sanded. 

A handmade snowflake embellishment tops it off.

Hope you like it. 

Here is a 3 minute video of our Christmas lights at our new house. It is not much but considering my hubby did it all while working 12 hour shift work and taking care of me, i think it is very nice. :)

Friday, November 30, 2012

Glittery Paper and Stickles Butterfly

Just a quick and simple card to share today.


I used some K and Co paper that has glitter on the flowers...


I inked the blue mat and butterfly with Faded Jeans Distress Ink then added Arctic Ice Stickles to the butterfly.

Hope you have a great weekend.

Sunday, November 25, 2012

Doily Christmas Tree

Well my friends if you liked the paper doily turkeys, you will love this!


It is a Christmas tree made from paper doilies.
I used Adirondack Color Wash in Meadow for the tree and in Red Pepper for the tree skirt.

Here is a video showing how to make it.

After I made the video, it occurred to me to put the tree on a battery operated tea light.

This is the regular candlelight version:

Here are the shots from when the tea light changes colors:


So FUN!

I would love to hear what you think.


Saturday, November 17, 2012

A-doily-able Turkey

Pardon my pun but I just can't resist a play on words. (notice I did not say a "good" pun). LOL

I was playing around with my new Adirondack Color Washes and some paper doilies I came across when unpacking. I made this cute little turkey.

I used 3 different sizes of doilies, sprayed the smallest one with Butterscotch, the medium doily with Red Pepper,


and the largest with both Butterscotch and Red Pepper for an orange color.

Here is a video showing how I folded the doilies and decorated the turkey.


The turkey cut files and patterns are part of a package I offer in my Etsy store.

Hope you like the project and get inspired to make some yourself.
Thanks.


Friday, November 9, 2012

Wedding Card With Roses

A couple of years ago, I made a heart side step card for my hubby at Valentine's. It was red and black and has received a lot of page views.

Then I had computer problems and the cut files were messed up. 
I have made some new heart files and combined them with others that I had made to come up with this lovely wedding card.

I wanted to keep the colors light so I went with Tattered Rose Distress ink and white. It does not show up in the picture but all of the white layers are covered with a sparkly Perfect Pearl powder. (so shimmery {)


You can see that I did a lot of dry embossing and ink blending. I also used a direct to paper technique on some of the embossed hearts. You can watch an old video I did using this technique here.)

A few of my Open Roses, a heart border file, and some self adhesive pearls and I was quite pleased with my card.

Hope you enjoy it too :) 

The cut files and instructions for the side step card with hearts will be available on my Etsy shop.
(flower files and instructions sold separately.)


Friday, November 2, 2012

I am serving leftovers


I was playing around with my scrap papers and die cuts. You know, all those little pieces that get cut and don't work out on your project. Well, my box of extras is getting pretty full. Here is a bird card I made with some of the scraps.

I used Twinkling H2Os to color the bird and the card base. The branch you see was actually two sets of leaves that I just cut and positioned to look like a branch. LOL The background paper is a scrap of Graphic 45 paper from the Tropical Travelogue line.

Here is another card with some leftovers.

These were Graphic 45 paper scraps as well. These came from Once upon a Springtime. I inked the edges and added some stickles to the leaf and vine.

Hope you have fun playing with your scraps too. :)

Tuesday, October 30, 2012

Glittered Pumpkin

I have seen so many decorated pumpkins on Pinterest. I decided to try one for myself.


I figured this was Fallish enough to keep around for a while as a decoration.

This is how I did it.


I used a foam pumpkin, a mask (from Tattered Angels), paint, paint brush, and glitter.

First I taped the mask to the pumpkin and traced around it. Pencil lines did not show up so I used a pen.
FYI- The pumpkin in the first picture was white with orange glitter but I have an orange pumpkin in this  photo. I had plans to cover the orange pumpkin in white glitter but I just ran out of the white glitter so no pictures of it. LOL

Next, I used a paint brush to apply the paint on the pumpkin and sprinkled glitter over the paint. I used paint instead of glue to cover up the pen lines and fill in the gaps of areas that did not get much glitter. 
I worked in small areas at a time so the paint did not dry before I added the glitter.

When the paint was dry, I covered the whole pumpkin in a clear acrylic spray to keep the glitter from coming off.

I love all the shimmery goodness. Would love to hear your comments on whether or not you think it is still cute to have around after Halloween.
Take care!

Saturday, October 27, 2012

Bird in a Blinged Cage

I shared a card last week with a birdcage cut file on it. I played around with it some more and made this A2 shaped card from it. (I needed to make it bigger so the roses were not so little)


This one is for my sister-in-law's birthday. I decided it needed a little bling. (LOL)

I used the Twinkling H2O on the cage then went over that with Gilder's Paste. It does not show up in the picture but it has sooo much shimmer.

The little birdie was inked with Broken China and given a tiny little rhinestone for an eye.

Check out the yellow background...I STAMPED that. Yes ME! LOL I am finally getting to where I like the results when I stamp.

I blended Scattered Straw on the paper then stamped over it with a Tim Holtz stamp in the same color. I really like that color. The edges are lightly inked in Black Soot and I went back and inked the top of the back cage cover after I took this photo so it blended in better.

The roses are inked in Worn Lipstick and the leaves inked in Peeled Paint, Shabby Shutters, and Forest Moss.

I have an old video on the leaves on YouTube. The Regal Roses and birdcage files will be available in my Etsy Shop.

We are having great weather here, Hope it does not get too bad for our friends on the East Coast. :)

Friday, October 26, 2012

Twinkling Butterfly

Hello my crafty friends. I have so many different projects going that I have neglected my blog and commenting this week. Here is a little thank you card I made with my new Twinkling H2O's.

It does not show up in the picture, but that butterfly is filled with shimmery goodness. These Twinkling H2O's are shimmery watercolor paints. They have been around for a few years now, but I am just getting around to trying them. I really like them. :)

You can do a YouTube search for the Twinkling H2O's and see more for yourself. 

The darker areas of the butterfly are the spots where I got more pigment and the lighter areas are the spots where I let the color wash out a little. I could have added more paint to make the color more uniform, but I liked this effect. I inked my background with Dusty Concord and Chipped Sapphire Distress Inks, They were the perfect match. :)

More to come.
Hope you have a great week end.

Friday, October 19, 2012

Craft Room with a View

Hello crafting buddies! I have a LO to share with you today. I have to admit that I have been making just cards for so long that I am rusty at layouts.

I have been watching Kathryn Krieger from Life on the Scrap Beach on Ustream (Kathryn Scraps) and YouTube (Kathryn Krieger). She is very talented and I have been learning some cool techniques. I really enjoy the Ustream broadcasts because it is live and you can chat with other crafters. It lets me feel like I can still participate in an activity even though I am homebound. Be sure and check out her blog and channels. You won't be disappointed.

Kathryn recently did a great video on YouTube on how to make a sunburst layout. You can check it out here. She challenged us to make a project based on her design. Well, it took me all week since I am rusty and things just kept interrupting me, but here is my shot at it.


I know, I added sooo much stuff that it is hard to see the sunburst design. LOL It is there though, I promise. :)

The pattern paper came from a 6 by 6 pack of Pink Paislee paper called She Art.


In her video, Kathryn uses circle embellishments to break up all the liner patterns going on. I used flowers instead because, well, handmade flowers are what I do. :) I also rounded the corners of the photos and added a doily with one round photo.


You can see the I-Top brad covered with paper and some paper strips I cut into banners.

I have mentioned before that my new craft room has great windows along the back wall. My sweet hubby bought me some feeders and plants to attract birds and squirrels. It is so fun to watch them. I get to see several different animals but this fox squirrel and this male cardinal are the most frequent visitors. The female cardinal is never far away but she is harder to photograph because she blends in so well.

I wanted to use some glittered Thickers for the title but I did not have all the letters I needed. I opted to cut the words out using my cutter and glittering them with Stickels.


I had so much going on in this page that my journaling was distracting. I decided to tuck it under one of the photos on a little tag.


Well, my squirrel buddy is back so I will end this post and watch him. :)
THANKS for sticking with me for this long post and please go check out Kathryn's blog and channels.

Have a great weekend!

Wednesday, October 17, 2012

Yellow Roses on Birdcage

Well, I was going to wait until my sister got this card before I posted it, but changed my mind. 
I made a new birdcage file that I am excited about and since the other yellow roses turned out so well a few weeks ago, I went with yellow again.
(Scattered Straw with Wild Honey on the edges. The leaves are Shabby Shutters and Peeled Paint with a tiny bit of Evergreen Bough)


The last few roses are the smallest I had made in a long time. I did not want to have the roses so big that they looked too big for the cage.

I am so happy with the effect I got with the birdcage. 
It does not show up as well in the photo, but it looks a little like metal in person.
I used white cardstock to cut out with one of my cut files. (I have a lot planned with this file so you will definitely be seeing it again soon.)
I stained it with Black Soot distress stain because it gives a mottled look when it dries. Then I applied some German Silver gilder's paste in a few areas.

Of course I added some bling because everybody like a little bling. :)
Check out the tiny stone in the glittered bird's eye. Too cute!


.

Friday, October 12, 2012

White and Gold Wedding Card

I needed to make some wedding cards for family members. Since I STILL have gold glitter embossing paper surrounding my work space, I decided to use it on this card. (That is one way to see your supplies so you remember to use them. LOL)


I used all white cardstock that I dry embossed and heat embossed. (I am getting better with my stamping :)

I used one of my oval frames files and a bride and groom file that I made months ago and never used, These files will be available in my Etsy store.

As always, the cut files, instructions, and video tutorial for the Center Step Card are located on the "Step Cards" tab under my blog header.

Hope everyone has a great weekend!


Wednesday, October 10, 2012

Foil embossed snowflakes

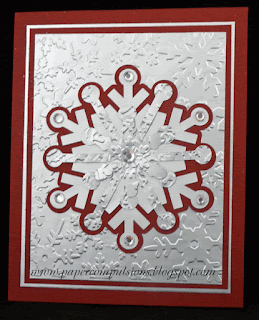
One last Christmas card.


I used my pain patch packaging to emboss snowflakes on this Christmas card. I cut a few of the snowflakes out and added some bling. (gotta' have the bling :)

Monday, October 8, 2012

O Christmas Tree

 I have a Christmas tree card to share today. I used green cardstock and gold glitter embossing powder. I have embossing glitter on EVERYTHING in the room including me. LOL It was worth it though.:)

I used a Christmas tree silhouette cut file that I made.  The shadow layer is embossed and the top layer is popped up with dots. You can download the tree here.

Saturday, October 6, 2012

Blue Christmas

I love the traditional Christmas colors but since blue is my favorite color, I prefer a blue Christmas. I played around with several blue shades of Distress ink and came up with this snowflake card.

As you can see I added a LOT of Ice Stickles! LOL. I just could not help myself. :)
The background is embossed with a Sizzix embossing folder and then I rubbed over the raised area with some cool new Gilder's Paste that I have been playing with. The silver outline, snowflakes, and sentiment are all covered with it too.  (I forgot to mention that the holly leaves from my previous post were covered with this Gilder's Paste.) It is like Rub'n Buff but it is creamier and is not toxic. You will be seeing more of the Gilder's Paste because it is so fun to play with. :) I got this German Silver paste and some Antique Gold. 

I ordered the paste online from Scrapadabadoo and just have to say that Carol and Barrie are so wonderful! They get your order out very quickly and send a handmade thank you card in your package. I have already ordered more goodies from them. They have so many cool things.


Thursday, October 4, 2012

Christmas card- Red Ornament

Hello all. I have been working on some Christmas cards. Here is a car that I did in red and gold.


I have had the patterned paper forever so I doubt it is still available. The ribbon is from an old Christmas project too. 

I made the cut file for the ornament. You can download the cut files and PDF templates here.


I was a little stumped on what to do to decorate the ornaments at first. I started looking at the blog's I follow and came across a beautiful card made by Margaret at Heavenly Mam. My card does not look anything like hers but I thought I would give a shout out since she did inspire me. :)

I used gold glitter embossing powder, a sentiment stamp, and a beautiful flourish stamp from Tim Holtz's Stampers Anonymous Christmas set: Reindeer in Flight. I also used some gold chalk ink to leave a faint decoration behind the "Merry Christmas".

You can download the holly cut files and templates here. 

Tuesday, October 2, 2012

Orange Roses


Yes , I know. This is another center step card. And yes, it is for another neighbor, but I wanted to share it anyway because I just love the color on these roses. I usually do not do a lot of orange roses. This K& Co Mariposa paper matstack was just calling out to be used and I thought orange flowers would be best. I used Scattered Straw, Wild Honey, and just a little Rusty Hinge. I was surprised at how much I liked them.

Hope you like them too. I promise to show something different soon. LOL

Saturday, September 29, 2012

Yellow Roses in Texas

My new neighbors are all so friendly! One brought me cookies, another brought brownies, and another brought wine. I feel so welcomed! Here is a thank you card I made for one of the ladies.

You can probably tell that center step cards are my go-to-card lately. I used K & Co. background papers and made some yellow Regal roses. I used Scattered Straw and Wild Honey for them. Love the color. I stained the seam binding Wild Honey stain.

The pearl cluster is a sticker from Michaels. I sniped out the part that was under the bow and added it to the top left corner. I figured it needed to be seen. LOL

Wednesday, September 26, 2012

Special Thank You Card

Well, you may have read that we recently moved. I love the new house and the view outside is great. The only sad thing about this move is that am going to have to change pharmacies. With all of my different medicines, that is not as easy as it sounds. I have been using the same local pharmacy for several years and the staff there is absolutely wonderful. They are so kind and patient and are always extremely helpful. That type of service is getting harder and harder to find these days.

I made the ladies at the pharmacy a special thank you card.


I have trouble photographing red cards. If anyone has any tips I would appreciate them.


It is a side step card where I used my Open Rose and Diamond Deco Design cut files. You can download the free Thank You caption cut files here.

The red bling is from some Bling on a Roll that my DH bought for me at Micheal's that I cut apart.The "Thank You" is cut from red then I spread red Stickles over the words.
(He went to the store when they where having a sale on bling and just grabbed what he thought I would like. When he saw that I used some of it on this card he said, "So, I did good on picking out the bling?" Love him!)


Sunday, September 23, 2012

Cropped Event Challenge 5

Hello again. I have another project for the Cropped Event Challenge #5. We had to ONLY USE paper. (and of course the adhesive of choice). Well, my followers know that if I have paper, glue, and my electronic cutting machine, I am all set. :)

I made a 5 1/2 inch square card with my Diamond Edged doilies and my Open Rose.
The card stock and patterned paper are from the mystery box I received for the event. I added some ivory card stock of my own.

The rose is one of my handmade paper roses. I use my cutter to cut the petals and then shape them and glue them in place. (If you look really close you can see the glue in the center because I was rushing and did not let it dry completely) LOL
Here is the paper after I cut my shapes.

Notice I also use up every scrap of paper. The other half of this sheet was used for the card base.