Sunday, December 12, 2010

Christmas card 2010

Wow, have you ever had a good idea for a craft project and then when it came time to actually do it you realized it was a lot more work than you thought? That is what happened to me this year with my Christmas cards. I have now embossed and glittered more than I thought I could. But of course once I made the first card and decided I liked it, I had to go ahead and make them. :) I think these cards are worth it, although I may rest a week or so before I start another craft project.-ha


I wrote Merry Christmas with a Cri-kit metallic pen.


Here are some of the cut files. I did most of the files in SCAL.


If I made mistakes or if you have any questions, please let me know.

MERRY CHRISTMAS

Christmas Card 2009

I did not have a blog this year so I thought I would post some pictures of last year's Christmas card.
I used transperancies cut into squares and foam tape to make windows. I put micro beads and giltter inside the "window" shaker. 

Then I framed the window with scalloped frames from a Cricut cartridge and added snowflakes. Most of the snowflakes were from Cricut. The jeweled flakes were from Oreintal Trade.


I made a charm from one of my Cricut font cartridges, turned it sideways, stamped Merry Christmas, and put a snowflake over the charm opening.

I think they turned out really well. I know everyone had fun shaking it. :)

update 12-12-10

Haven't blogged for a while. I had 2 surgical proceedures and have been working on Chritmas cards.

Tuesday, October 26, 2010

pumpkin booklet

Here is a little pumpkin booklet that I made for pictures.


I embossed the pieces on the cover with Cuttlebug- Victoria and inked the edges.
Here is the svg file and the scut file.

Tuesday, October 12, 2010

Stamped Cards

I am not very good at stamping. I have trouble getting a clear, clean image. I would rather manipulate paper for my cards and other crafts. I have played around with my stamps lately to see if I could get any better results. I am still not sure if I have gotten any better at stamping. The practice did make me think of my projects a little differently though so it was worth while. Tell me what you think.
This one was stamped with clear Staz On ink and heat embossed with silver embossing powder. The large snowflake was cut the the Cricut Accent Essentials cartridge, inked, and embossed.  

 This one was just stamped with silver ink.
This one was stamped and covered with holographic embossing powder.

The finished products look ok, but what you can't see is that the embellishments are covering up the blank spaces where I did not get even coverage from the stamp. (I am not sure if I did not get ink in that area or if I am just not applying even pressure.)

With the next card, I used a stamp that I made using the Cricut stamp kit. It is ok, but the ink kind of smears when stamped with the rubber in the kit.
The flower is made from four different sizes of daisy shaped flowers.
I still think I would have saved a lot of time if I had just used patterned paper on this one. :)


Friday, October 8, 2010

purple flower card

I am not sure if a flower exists like this in nature, but it matched my card and I thought it was pretty.
I used K & Co patterned paper along with purple, black, and cream cardstock. The embossed portion is from Cuttlebug Victoria. The flower was made from my cut files, sculpted, glued, and shimmer sprayed.

Flower SVG

Flower SCAL


Tuesday, October 5, 2010

Red card with lace doily circle, CSC08

I decided to enter one more card in this week's CASE Study Challenge. This card has red and cream colored cardstock along with Anna Griffin patterened paper. I cut the eyelet lace strip and the paper doily with SCAL and accordian-folded the red circle. The sentiment is from a Heidi Grace Designs stamp set.

Monday, October 4, 2010

Spirelli design cards CSC08

This is a twist on the inspiration card for the Case Study challenge (see link below). I used scalloped circles cut out of cardstock and wrapped in 3 strands of embroidery floss. I love the designs that are made. The more space you skip when you start wrapping, the smaller the circle in the middle will be.


You can use any shape for the Spirelli designs, but I like circles and ovals the best. It does not have to be a scalloped shape either. I have used circles with spokes on them from the Cricut Accent Essentials cartridge as well as the shape from the I-top Brad Maker punch. The more spokes or scallops there are the tighter the design.

Saturday, October 2, 2010

Blue Bird Card

I have been making several cards for a project I am working on. This is one of the cards.
I got the card cut file from Wanda's Crafts. The sentiment is a stamped from a Heidi Grace Designs stamp set. The bird was cut from the same cut file as my previos post and stamped with a flourish stamp from Stampin' Up Baroque Motifs.

Thursday, September 23, 2010

Another pink card for the challenge

I liked the colors in the Off the Wall Craftiness challenge so much I decided to make another card with the same colors. (Refer to previous post for pictures of colors and inspiration for challenge) A friend of the family has a b-day coming up and she loves pink and bling. This card should be perfect for her.
I used : Dark gray and light pink Bazzil cardstock; Recollections hot pink patterned paper; Fiskers scalloped border punch with holes; Mark Richards- Crystal Stickers rhinestones; Versamark; heat tool; Stampin' Up "Baroque Motifs" stamp; Comotion hot pink embossing powder; and Ranger holographic embossing powder.  

Bird cut files

SVG

SCAL

Off The Wall Craftiness challenge #25

I made this card for the Off the Wall Craftiness Challenge #25
It is a color challenge using these colors
This is the inspriation picture.
Yummy!

I used light and darker pink cardstock, gray cardstock, and K&Co patterned paper.
I did not have the right shade of pink ribbon so I scored and pleated paper.
The butterflies are from thr Cricut Home Accents cartridge. I covered them with adhesive and clear micro beads. The flourish is also from the Home Accents cartridge. The pink rhinestones are from K&Co.
 

For my husband

For a soldier

Monday, September 20, 2010

Another paper rose

I loved the paper roses I made so much that I had to make another card.
It is a Z fold card. (this is a side view)


Quilled Hummingbird card

This Z fold card is going to a friend of the family. It is done by quilling 1/8 inch wide paper with a quilling tool and quilling comb. The comb looks similar to the old hairpicks we used to poof our permed hair with back in the 80's (I guess I am dating myself, huh)  I got my supplies from Quilling Creations.
Materials: light purple cardstock for card base, white cardstock for scalloped rectangles and embossed panel, Cuttlebug embossing folder- Victoria, K&Co decorative paper, quilling paper, quilling tool, comb. 

Tuesday, September 14, 2010

Paper Flower Violet or Pansy?

I like to quill and make paper flowers so I thougt I wouls try my hand at making cut files for this flower. It looks like a pansy to me but the flower picture I based it on called it a violet. All I know is that I thought it was pretty.
The embossed panel is Coredinations. (this was actually a sample insert from a craft magazine)
I shaped the flower pieces with a stylus and my fingers, scored the leaves, and chalked all of them with chalk pencils. The chalk gave a lighter effect than markers or ink.
 
Then I added Perfect Pearls.

The inside image is stamped and watercolored.

Monday, September 13, 2010

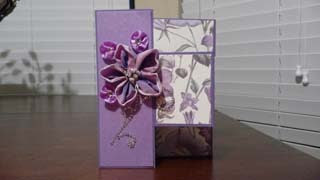
Purple Side Step Card


This is a side step card I made for a friend's birthday. I thought it turned out really well.

Materials:
Purple cardstock
Purple glitter effects paper
Anna Griffin floral patterned paper
Cream cardstock embossed with Cuttlebug Victoria embossing folder
Purple metallic Cri-Kits pen
1" Purple variegated wire ribbon
1/2" light purple ribbon
 5 glass beads
3 medium rhinestones
2 (Icons) rhinestone flourishes
Embroidery floss


I used Artistic font welded together and written in metallic Cri-Kits pen.

Notes for birdhouse card

I forgot to mention that in the cutting files for the birdhouse card, the scalloped border and roof pieces are cut longer than you actually need them so you can place them easily then trim off the excess.

Top fold bracket border edged card

This is a card I made for my sister-in-law. I copied it from a card in the January 2010 issue of Card Maker Magazine.


There is a light gray cardstock base cut at 4 1/4 x 11 that is folded at the top.
The next panel is pink cardstock cut at 4 1/8 x 5 3/8.
( the inside is covered in two identical pink panels)
The black panel is 4 x 5 1/4 and has a bracket border edge.
The large white panel is cut at 3 7/8 x 5 1/8 with a bracket border edge at the bottom.
I used the Swiss Dots embossing folder on the bottom 2/3 of the top white panel,
I used the same bracket border to make the smaller gray 1 3/4 inch gray square and 1 1/2 inch white square.
The 1 inch pink heart was covered in clear micro-marbles.
I added two flourishes from a file I found on the web (sorry I don't remember where)
and finished it off with small rhinestones along the flourishes and at the bottom
and a black ribbon.

I made the cut files in Inkscape and used Sure Cuts A Lot to cut them with my Cricut.
(what did we crafters ever do before the Cricut???)
The same brackets were used for the bottom border and the square shapes.
(I don't remember which font I used)

Here are the cutting files for everything except the flourishes.


SCAL

Hope you enoy this.
Please post a comment :)

birdhouse card

After listening to the birds sing outside, I was inspired to make a birdhouse shaped card. I had seen one in the July 2010 issue of Card Maker Magazine. I made a svg file and a scut file for Sure Cuts A Lot. I like it so much I made several.

On some of the cards, I used blue & white patterned paper.

On other cards I used white cardstock that I embossed with the "birds and swirls" Cuttlebug embossing folder. The embossed image was inked with blue ink.

I ran the bird through my Xyron adhesive machine right-side down then applied glitter.


It may be difficult to see in the picture, but the bird has a rhinestone eye.


The large flower on the front is from Penny Duncan's site. If you would like her cut file click here. She has A lot of inspiring photos, tutorials, and tons of free svg files.

For all other card elements:


(not pictured here)


If you have any problems with the cut files please leave a comment or email me so I can fix it.
Hope you enjoyed this post.

First post on my new blog

Well, I am not completly sure about how to post pictures, files, and links. If you notice any problems please leave a comment or send me an email. Thanks