Showing posts with label video. Show all posts

Saturday, August 30, 2014

Cards using Kaisercraft BeYoutiful papers


The Kaisercraft paper line, BeYOUtiful, is stunning.
you can check the papers out on this video.


All the lovely flowers on the patterned papers inspired me to make flowers of my own.


I usually use Neenah White 110 pound cardstock paper for my flowers.
Then I ink them with TH Distress inks or LSG sprays/
This time, I tried to use the Kaisercraft papers.


The colors are great but the paper did not hold up well
under all the shaping that I do to make the flowers.
 I pieced the broken petals together but it was a labor of love.

I already have video tutorials on these flowers.
The small dark red flowers are Open Flowers. The medium yellow flowers are here.
The Large rose tutorial is offered on my sidebar.
This Open Rose tutorial includes the cut files and links to 1 1/2 hours of video instruction.

For the next card, I went back to the Neenah cardstock for the flowers.

These Loose Roses are colored with
Scattered Straw Distress Stain and Mustard Seed Distress Ink.
There is a 2 part tutorial.
Part 1     Part 2


The rest of the papers were just calling me to make more cards.
So I did. LOL

Here is an A2 sized card with yellow roses
from the Collection pack.

Here is a video showing how it came together.

I used a white card base, black mat, yellow mat, 3 by 4 cut apart card, and the rose is from the Collections pack.

And here is another A2 card

Thursday, July 24, 2014

Glittered Backgrounds and Vellum Flowers

I have some lovely vellum flowers to show you along with some beautiful glittered backgrounds.


First, pop over to the Scrapadabadoo Blog 
to watch the video on how to do these
awesome glittered backgrounds using
glitter, stencils, and adhesive backed paper.


Now, for the vellum flowers.
They are very easy to make and you will get stunning results.


I have used vellum and the Tim Holtz Tattered Florals die for these.

This first video shows how to color the vellum and how to make the large flower. 


The second video shows how to make the daisy type medium flower and the smaller  yellow flowers.


www.youtube.com/watch?v=eath_cqarRI

I hope you feel inspired to make some vellum flowers and glittered backgrounds.
Be sure and post your creations on the Scrapadabadoo FaceBook page so everyone to see. Remember, the only requirement is to have fun crafting:) 

Supply links
LSG Sprays used
Glass beads -white and black set
Vellum

Wednesday, June 18, 2014

Yay! Summer


Well, it looks like Summer may actually come after all. It was such a crazy Winter and Spring that I was beginning to wonder if Summer would make it or not.

The fun colors in the Bo Bunny Lemonade Stand paper line reflect the excitement of summer activities to come.

The dark navy cardbase is A2 sized. Then there is a layer of white cardstock cut at 5 1/4 by 4 inches. Next is a green layer cut from the Lemonade Stand 6 by 6 pad. It is cut at 3 7/8 by 5 1/8 inches. Next is the red Double Dot layer that is 3 by 4 1/2 inches. (Scrapadabadoo has the Bo Bunny Double Dot papers that match the Lemonade Stand line in a convenient cardstock paper pack) The "Yay Summer" sign with it's colorful background is from the cut apart sheet that comes in the 12 by 12 papers. The ticket sticker border is included too. There was a cute little flower on the cut apart tag but since this card is going to an 11 year old boy I thought I would cover it up. LOL The chipboard star from the button pack worked perfectly. 

The card sketch for this Scrapadabadoo Crafts FB challenge
includes a banner. I used twine and pieces cut from the 6 by 6 
paper pad to make the two banners on my card. 

There is a banner in the embellishment pack that is ready to be used but I already have big plans for it. LOL


This Lemonade Stand collection is so fun! If you want to get a good look at it, check out this video where I show it off.
  

Wednesday, June 4, 2014

Primrose Cards with Bo Bunny Papers


Check out the beautiful cards I made using the Bo Bunny Primrose 12 by 12 paper pad from


I got a little carried away, but with all these
beautiful butterflies and lovely papers,
who can blame me. LOL


You can "catch" the instructional videos on how
easily these cards came together on the 

(you won't even need a net)
LOL

Saturday, May 3, 2014

The Ups and Downs of Flowers (tutorial)

My 2nd flower tutorial is on the Scrapadabadoo blog today.
It features these flowers.


You can pop over there to download the instructions, cut files, and patterns.

I have the video tutorials here.

First, we should review from last week.
I show how to curl the flower petals down.

That was easy!
Now let's turn the petals up!
This is an older video but the rules still apply.


Now you should be all set to combine the 2 and curl petals up and down.


Easy peasy! Right?

Here are a few more short videos on papers and decorating the chalkboard flowers.


I hope you will try making the lovely flowers and show them in the Scrapadabadoo Crafts FaceBook page.

Here are some handy links for supplies:


Chalkboard


Have fun crafting!

Sunday, April 27, 2014

Clay Roses Tutorial

I have been having so much fun playing with all my crafty goodies from Scrapadabadoo. I have been wanting to make a video tutorial on making clay roses for a while. With my physical problems I have to work a little then rest. I have slowly gotten all this together piece by piece.I think you will really like it.


Here is a short video showing how I put this magnet together.
(I figured out how to add music to my videos. YAY ME! LOL)

Clay Rose Magnet


Here is another video showing how to color your white air dry clay with Lindy's Stamp Gang sprays.

Coloring Clay with LSG Sprays 


And now for the video showing how to make a full rose.

Clay Rose Tutorial


And here is the last video showing how to make the rose buds and leaves.

Clay rose buds and leaves


I got all my supplies from Scrapadabadoo.

Supplies


(could also use) Fimo Classic Clay White

Lindy’s Stamp Gang Sprays

( could also use) Provo Craft Cricut Spatula

  
Clay Rose Magnet Supplies


Even the lid came from something I ordered from Scrapa LOL.

Hope you enjoy these videos and make some lovely clay roses.

Sunday, April 13, 2014

Decorated Gift Box


Hello my crafty friends. I did not realize it had been so long since I posted. I have been busy crafting and taking pictures but forgetting to post. Oh well, I promise to catch up.

I made this lovely decorated gift box for the Scrapadabadoo FB challenge. Last Monday they started having challenges every other Monday. It is all just for fun. No pressure. The current challenge is a grid challenge where you pick three items in a row from the grid.
I decided to pick the 3 on the left; flowers, ribbon, and bows.

I cut the gift box and the decorative panels out with cut files that I made. You can get the cut files here.  There is also a 12 minute video if you are interested in how I put it together.


 I made the flowers using my Open Rose and Pretty Flower files and techniques.


I was lucky enough to be chosen for the Scrapadabadoo Design Team !
I will be posting lots of new projects soon. 

Papers Used:


Thursday, March 6, 2014

Coloring Flowers and Leaves


I am so ready for Spring to arrive and stay for awhile. I have been using a lot of bright colors in my cards and flowers hoping that Spring would hurry. LOL

For this cards, I used TH Distress Paints in Scattered Straw and Ripe Raspberry. For the background I put the paints on the paper then spritzed it with water to make the colors blend. The flowers were painted then the yellow flowers got an added touch. I spritzed my mat with water to pick up the left over paint from when I paint the flowers and brushed it on the petals.

Here is a 12 1/2 minute video showing the different ways I color my handmade flowers and leaves.

Wednesday, January 22, 2014

Combining the Old with the New

I have been playing with my Inca Gold pastes that I got for Christmas while trying to use up some of the stuff in my ever growing pile of "stash". One of the downfalls of being able to think of cool crafty things to do with most everything I see it that I want to collect it ALL. Then life happens and I never get around to using half of it. Well, I am trying to destash. To make it a bit more fun, I am also using some of my new products along with the way.

Here are a few cards I made using old papers, die cuts, and glitter along with my new Inca Gold Turquoise and a new embossing folder from Spellbinder's. 


I cut these butterfly pieces out of some self adhesive paper that I bought on sale last year and have barely used. I tired a new twist on glittering them. 
Here is a video.


Take a look at some of the other versions of this card.
  
I used Liquid Pearls instead of a die cut here.
The background is embossed with the same Mbossabilities folder. 

Here you see the same types of butterflies on a leaf die cut and old patterned paper.


I hope you give this little glitter trick a try and have fun using up some of your own stash. :)

Thursday, August 29, 2013

Red Open Roses


Well, I am FINALLY back. LOL

Huge thank you to everyone who wished me well. It is a long story. but the good news is that the pain pump is now implanted and is helping a lot with the nerve pain. :) Praise the Lord!

I have had really bad spinal headaches since the pain pump was put in but I had a procedure today that patched the leak and should be better than ever by tomorrow. Yay!

I made this center step card with my handmade open roses as a thank you for a dear friend who sent me lots of encouragement. I used some Kaisercraft Porcelain Rose papers. ("Precious" and "Artifact") along with some Recollections pearl stickers. The flowers where cut from white cardstock and inked with Worn Lipstick and Barn Door Distress inks. I used the same colors in Distress Stains to color the seam binding.

You can find instructions, diagrams, templates, cut files and a video on how to make the center  step card here. (just scroll down to Center Step Card)

I have lots of cool projects already in the works.

Thursday, April 4, 2013

Inking on raised embossing

Hello all. I made a couple of really quick videos showing how I ink on the embossed area of cards, It makes a really cool background.


Here is the short video showing how to ink on embossed metal or foil paper.
(less than 4 minutes)


Just in case anyone wanted to know how I ink on these embossed areas, here is a quick tutorial. (less than 8 minutes)


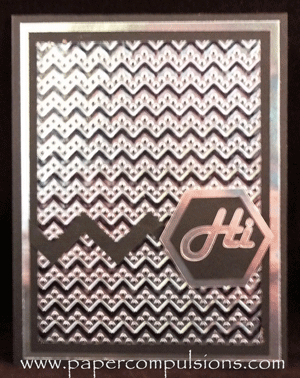
You can download the Chevron and Hexagon cut files that I used here.


Tomorrow I will have a video showing how to remove ink like I did for this card.


Tuesday, April 2, 2013

Trendy Embossing


I bought the M-Bossibilities  "So Trendy". This Spellbinder's embossing folder has 2 sides so you can get 2 different embossed patterns from it, hexagon or chevron. (genius!)

I think it makes such wonderfully embossed panels that can stand alone without much embellishment. Perfect for masculine cards.

For the cards pictured above, used foil paper and inked over it. (I'll have to show that in a video soon)

The raised images the folder makes looks great on both sides.

Here you can see where I inked the side with the raised chevrons in Peacock Feathers and the side with the de-bossed chevrons in Seedless Preserves.


Saturday, January 26, 2013

Mini Gumball Machines

How CUTE are these!


There is one where the part that holds the candy is round and another where it is square.

And they WORK!


The lid comes off so you can fill it with candy. Then you turn the little handle and open the door to dispense the candy. 


You may remember the gumball machine that I made last year...

It was pretty plain and did not work,

I finally figured out how to redesign it. I am so pleased with it.
I even had a really good day and was able to make some videos to show how they are assembled.

There are 4 different videos but you can watch the first part here and then link to the other ones.

I think they are lots of fun and super cute. What a great way to dispense candy. :)


You can purchase the cut files and patterns in my Etsy shop.

Sunday, November 25, 2012

Doily Christmas Tree

Well my friends if you liked the paper doily turkeys, you will love this!


It is a Christmas tree made from paper doilies.
I used Adirondack Color Wash in Meadow for the tree and in Red Pepper for the tree skirt.

Here is a video showing how to make it.

After I made the video, it occurred to me to put the tree on a battery operated tea light.

This is the regular candlelight version:

Here are the shots from when the tea light changes colors:


So FUN!

I would love to hear what you think.