Wednesday, February 29, 2012

Graphic45 Peek-a-boo card

I shared several pictures of this peek-a-boo card on my audition post. 


Here are a few more close-ups and a 4 minute video.


I will share the cut files, templates, and a "how to" video showing how to make a Peek-a-boo card tomorrow.


I hope you get some inspiration and make something with your pretty papers! 

Monday, February 27, 2012

Rounded corners tag

Hello crafters! Thank you so much for all the great comments on my last post. I APPRECIATE them so much! I feel the crafty love. :)


Since there was way too much goodness to go into details, I will be going through the projects a little slower this week.
(I have not forgotten about the "ruffled ribbon" tutorial or the quilling project tutorials that I promised. I am just postponing them a little :)


I will start with the rounded corners tag that had the roses and beaded pearl spray.


I made the beaded spray by following the directions that LuvleeScrappin gives in her video tutorial; bead spray - http://www.youtube.com/watch?v=AljxwrgqHto

You may also want to check out her other video tutorial on making a Daisy Chain bead spray.
I used to make Daisy Chain bracelets for my nieces years ago so I look forward to trying this one!

I used Graphic 45's Love's Labyrinth paper along with some cream colored card stock. I dyed the seam binding with TH Distress Stains. (Bundled Sage, Spiced Marmalade, and Dried Marigold) 

The roses were a little trickier to color. I tried several different colors before deciding on an combination that I never would have guessed. Spun Sugar, Victorian Velvet, and Rusty Hinge,
(Who would have guessed???)


I made a little picture to show the colors that I used for each layer.
(pictures always help...LOL)

click to enlarge


Sunday, February 26, 2012

Graphic 45 Design Team 2012 Audition

Well my crafty friends, I think I have a new obsession! I finally overcame my inhibitions for cutting into my Graphic 45 paper and now I am HOOKED! LOL


I know I am not the only one to confess that I tend to hoard designer papers. I pace them in my paper stacks and take them out to look at them every once in a while. They are so pretty that I don't want to cut them. Especially the beautiful Graphic 45 papers! After months and weeks of gazing at these beautiful papers, I decided it was time to cut. I am SO glad that I did! Not only did I enjoy making these creations using the Graphic 45 papers, I also love looking at my finished projects. (I took the plunge just in time to try out for the DT too) I will show them by paper collections. There will be more pictures and information about each project during the next week.  Take a look and let me know what you think. (This is a long post, but I promise you will want to see it all :)


Once Upon a Springtime 8 x 8 papers


This enchanted little fairy garden is a peek-a-boo card.
(You may recognize the archway. I used the same cut file that I made for my blog header sign :)
It is packed with whimsy and cuteness.


Of course I HAD to add some paper flowers!
This time I used my "small flowers" cut file and added gold micro beads to the center.
Then I added some of the gorgeousness Graphic 45 flowers from the Primrose Cottage paper.


I used the same small flowers in this desk calendar project.


I sent it to a friend in this lovely gift box that I topped with pearls and my handmade "open rose" and "5 point" flowers. 
I changed the format of my calendar pages slightly since I took those pictures. You can download the free printable here; Calendar


Then I moved on to the 12x 12...

Love's Labyrinth

I used my "Regal Rose" cut files for this tag. I make the cut files for the flowers, cut them out on neutral colored card stock with my Black Cat electric cutting machine, and ink them with Tim Holt Distress Ink. 


You can download a PDF copy of the tag layers. You can print them out to use as a pattern.
Come back tomorrow to get the free cut files.


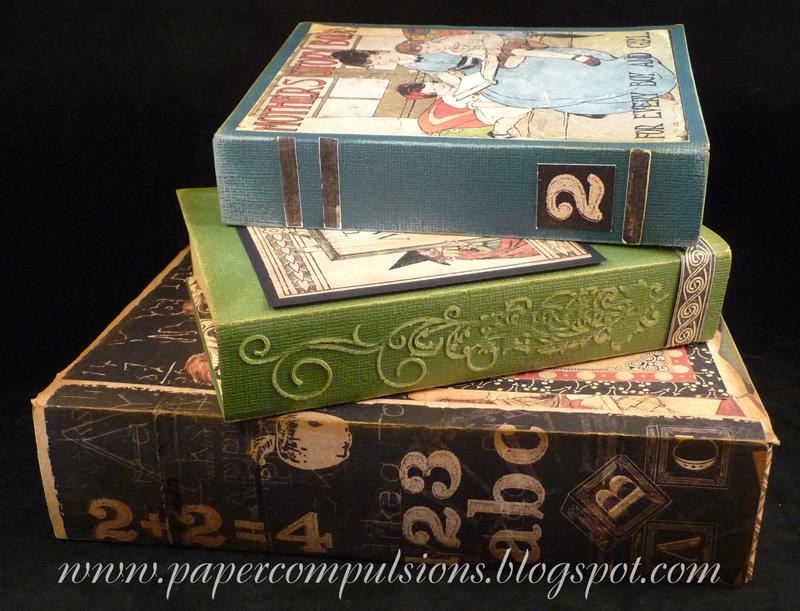
ABC Primer Collection
& Signature Series Core-dinations Paper


They look like old school books, but they are really boxes. The boxes would be great to hold mini-albums, craft supplies, or school supplies. Can't you just see these on the corner of a teacher's desk?


The Core-dinations papers have a white core and look great when sanded, embossed, or inked. Of course they are the perfect colors to match the other Graphic 45 sheets.


I bound them up with a cute little belt made from an embossed sheet from the Graphic 45 Signature Series. I used the buckle cut file that I made for my Tool Belt Card. The silver is from my pain patch packaging and slightly colored with alcohol inks. The buckle actually works and the belt can be easily removed.


Tropical Travelogue Collection

Here are a couple of lovely cards using these vivid Graphic 45 papers and more of my handmade flowers. The cut files for these flowers came from Penny Duncan. (she is great!)


Love the post card look that is so popular now.

I have saved the best for last.
You may remember my Beach Explosion Box from this summer. Well look at the new improved version using Graphic 45 papers! (I am getting so addicted to this line :)


Great little hut, huh?
Let's  take the lid off and take a peak inside...


LOVE these papers!
Here is a closer look at the pages.

The wave details were cut from more of the Signature Series Core-dinations paper, embossed, and sanded. The portion that was cut from the center is what I used for the corner decorations.

I used more of the S.S. paper for the island and palms.
You may recognize the palm trees from my "Where's Santa?" card from my guest designer spot for The Paper Dolls

Well thank you, friends, for sticking with me through my rantings. I also want to thank the Graphic 45 team for considering my application.

There was way too much goodness to share on this post. I will be showing more pictures and information about each of the projects throughout this week. I will also include some cut files, instructions, and even some videos. Hope you decide to come back.

Enjoy!


Tuesday, February 21, 2012

Roses and D'mask

Hello blogger friends. I have a card to share with you that is very special to me. I made it for my sister's birthday. She loves purple so that was my first color choice. For some reason the colors don't photograph well, but they are so pretty in person.


Check out the purple and black paper. At first I panned to use black and white D'mask paper and have purple accents. The D'mask paper is flocked and feels so luxurious. The problem was that when I started to add the black and white paper, it was too big of a contrast with all the black and purple.

So I came up with a good idea. Those are so few and far between sometimes so I decided to document it with a really quick video. LOL


You can't see the sparkle in the pictures or video but it glimmers. The flock is completely fine too.

Here is another little video showing how I arrange my handmade paper roses on cards and other projects.


After many, many, many attempts and several hours worth of useless videos, I finally came up with a way to explain how to make these flowers.  I am going to call these "Regal Rose" because they are different than the "Cabbage Rose".


The video links to the Regal Rose Tutorial videos will be on my sidebar as well as my Etsy shop. Fair warning, these flowers are detailed and take several steps. (Some of us like that sort of thing and others do not) I just do not want anyone to purchase the cut files and links to the videos and then be disappointed because you decided that it was too much work or that you just don't have time to make them.  I believe in knowing what you are getting :)

Sunday, February 19, 2012

Card Pattern Sketch # 153

When I saw this week's sketch at Card Patterns Challenge BlogI immediately thought of the butterfly card I made last week. I still had the scraps nearby but I chose to use a handy little butterfly paper punch this time.
I mounted each butterfly with a 3/4 inch square of pink cardstock. The edges of the card were inked with Antique Linen. The crinkle ribbon was dyed using TH Distress Stain; Tattered Rose.
I used a simple running stitch to gather the ribbon and taped it onto the card with my ATG.  The scalloped border was from my stash. My Sew Easy straight stitch made the holes and pink embroidery thread added the perfect little touch. 

I even added a cute little butterfly charm that I got in a recent swap.


I am entering this card in the Card Patterns Sketch #153.
Here is the sketch...

Yep, I know I took a literal approach on the sketch, but I like it.

Leave a comment if you would like to see a tutorial on the ruffled crinkled ribbon.

Friday, February 17, 2012

Super CUTE cupcakes

Look at this! Is this not one of the cutest things you have seen in a while???


It is a QUILLED CUPCAKE BOX!
Yes those are 1/4 inch strips of paper! 
It is a very small box that could hold a Hershey's Kiss or some tiny trinket.
I think it is ADORABLE if I do say so myself. LOL   It was made from a kit that I bought at Paper Wishes so it is not like I am bragging on myself for coming up with the idea. I just followed the directions. 


I made two more. 
 A swirled chocolate cupcake with a cherry on top :)

 A frilly cupcake with a heart on top.

Don't look too close because I got a lot of messy glue on this one. haha
My heart is not symmetrical but at least it is "in the right place" LOL
(Yes, by the way, I have taken a lot of pain medicine today :)


The $15 kit comes with paper and instructions for 6 cupcake boxes. A quilling tool, glue, curling coach, and mini mold set are also used. I tried to make one without the curling coach and mini mold but ended up with a big ugly mess so I highly recommend them unless you have a bit of experience in quilling :) 
(I know several of you have awesome quilling skills because I have seen your beautiful work)
I did alter some of the details slightly such as making the candle taller.


I am sending the to my niece who collects anything to do with cupcakes. I know she will love them as much as I do.


I need to brush up on my quilled flowers and share those soon as well as a tutorial on how to make a quilled hummingbird using a combing technique.  (which is fairly easy)

Wednesday, February 15, 2012

Late Valentine Picts

Well,  I am a little late in posting this. Hope you all had a great Valentine's Day.


Here is a picture of the car I made for my sweetie. (I took over a dozen pictures because the red did not show up well. This was as good as I could get. I promise the ribbon matches in person...LOL)
I have not quilled in a while. He always likes quilling though so I figured I make him a heart.


I stamped in the inside And added a tag that I got from MTCSCAL-E-Files a couple of years ago.
(Sorry Ladies, the rest of the inside is just for my hubby LOL)

I also made him a cute pillow box using a printable file from BlueCat. She has some awesome files that she generously gives away for free. Go check out her files at CartezChezBlueCat.
Be sure and leave some blog love :)


Sunday, February 12, 2012

Pizza Box for The Crafter's Cafe'

Hello there. I  hope you are having a wonderful day! 
I had a lot of fun last night doing an online chat and project at The Crafter's Cafe'. They are a wonderful group of ladies and it was so fun to feel like I was part of a crafting group for a little while. Since I am not physically able to go be a part of a crop or craft group, this was a treat.  I could not join in for very long because I was not feeling well but I was able to make this really pretty pizza box.


We got the instructions for making the box itself at Split Coast Stampers. I was able to use several of my left overs  from other projects to decorate it so it went together really quickly. (That is rare for me. LOL)


I even put a little design on the inside lid.

I had a lot of fun with the group and am glad I was able to use some of my stash :)