
Here are pictures and some video tutorials for my handmade paper flowers.
They are listed in order of difficulty.
You will want to scroll down to find the flower you want to see.
At the very bottom there are links to tips, techniques, and leaf tutorials.
Easy Flowers
I don't really know what to call these flowers.
I am going with flower 1, 2, & 3 (creative, huh)
(I have also added the "small flowers" and "Mumms" at the bottom of this page)
(I have also added the "small flowers" and "Mumms" at the bottom of this page)
Flower 1
aka Multi-layered flower
aka Multi-layered flower

Start with a simple daisy shape. (I like to have 6 to 8 petals per flower shape.)
Cut at least 6 to 8 shapes that decrease in size by 1/4 increments.

Next color the flowers if you want.
I like to add color just to the ends or just to the center.

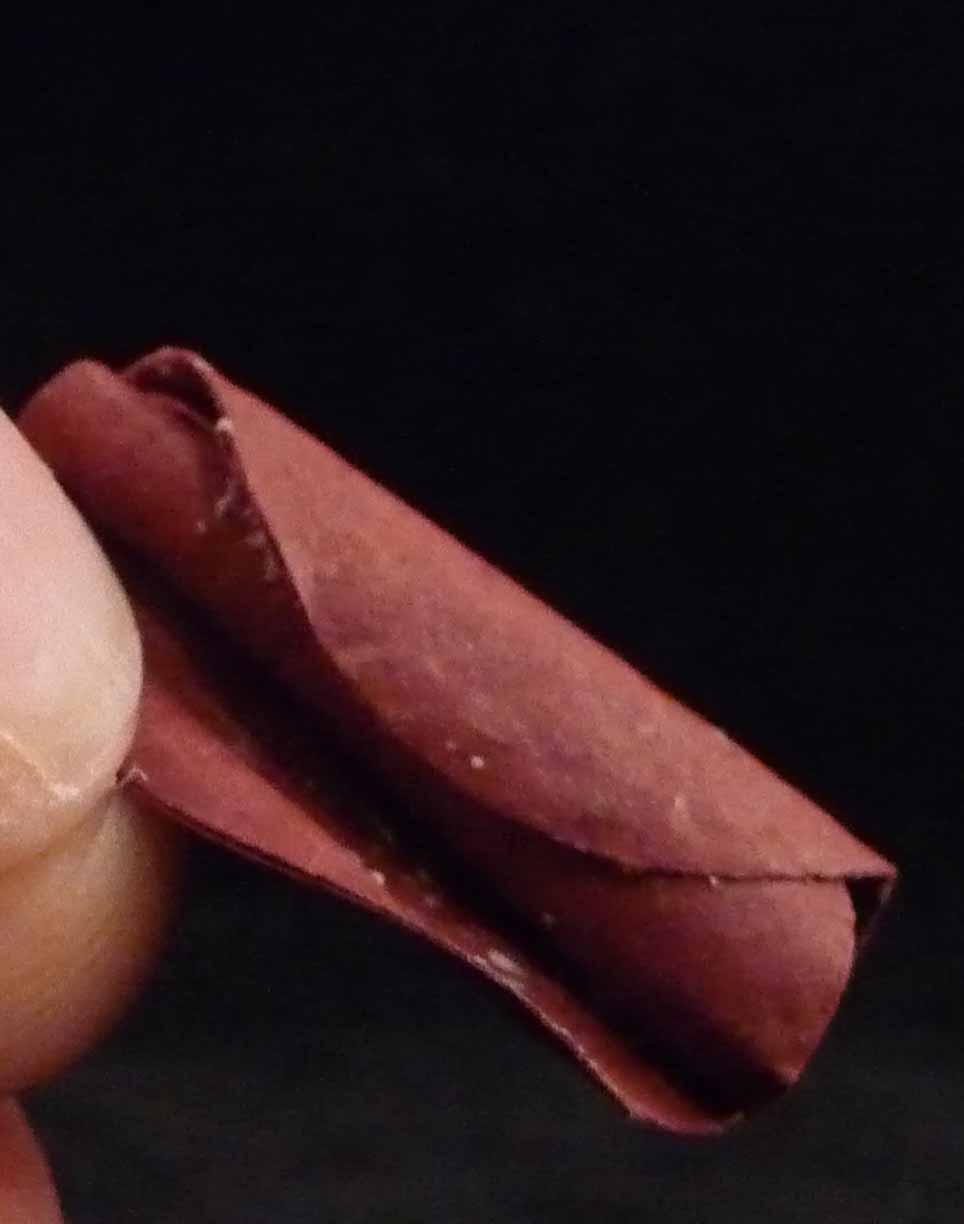
Now use a small smooth round tool to "curl" the ends up.
You can use a needle tool, skewer, end of a paintbrush, etc.
Put the tool on top of the petal and sandwich the petal between your thumb and the tool. Start at the base of the petal. Slide your thumb and tool towards the end pressing thumb to tool just like curling ribbon.
This is a picture of me curling a petal down instead of up, but you get the idea.


It will look like this.
Do this to all the petals.

Start with the largest shape, place glue in the center and stack the next smallest shape on top. Stagger the petals.


Add some bling and you're done.

Flowers 2 & 3

Here is a link to the video: http://www.youtube.com/watch?v=bXhAvqjggR0
Cut out any five petaled flower.
You can download the SVG cut file and PDF templates here.
Color your petals if desired.
Use small, smooth, round tool to curl the petals down.

Next bend all the petals up about 90 degrees and back down again.

This makes the center a little lower than the petals.
 Glue center, stack, stagger petals, and add bling.
You are done with flower 2.
For flower 3, curl the petals down then bend them up just like you did for flower 2.
Now use tool to cup the petals in by putting the tool in the center of each petal and rocking it left to right around the tool.


Glue, stack, stagger petals, and add bling.
ta-da!


The one on the right, flower 2, looks better when you attach it to your project :)
If you have any other subjects you would like to see explained, just let me know.
Basic Flower Tutorial
Here is a link to the "pretty flower" video:
http://www.youtube.com/watch?v=fkNIhW0UX7Y
This is similar to my "Pretty Flower" tutorial, but I had better pictures for this one.

Here is a picture tutorial on how to make this pretty paper flower.
Materials needed:

2 flower shapes and 2 center star shapes.
Here are the cut file files for digital cutting machines:
Here is a pdf file you can use to print out and cut the shapes by hand.
If you need another format just email me at papercompulsions@blogspot.com and I will see what I can do.


A syylus, paper piercing tool, rubbber mat (or mouse pad), glue, and chalk or ink.
 You might also want to add Glimmer mist or Perfect Pearls.
Directions:
1) Color petals with ink, chalk, mist, or mica powder (Perfect pearls). You may need to mist the petals with water or hairspray to set the Perfect pearls or chalks.


2) Place a petal shape on the mat. Use stylus to make large circular motions on the petals with medium pressure. This breaks down the fibers in the paper and allows you to mold the petals.

Next make smaller circular motions with firmer pressure. Do this to all the petals on both flower shapes.

3) Now use the back of the stylus or a piercing tool to press against the backside of each petal while holding your thumb against the front. (Similar to pressing curling ribbon between scissors and your thumb)
With a light pressure "curl" each petal outward.

4) Place flower shape on mat and press piercing tool against the center of each petal as shown.


5) Use the bottom of piercing tool or pen/ pencil to press the center of the flower down, cupping the flower shape.

6) Use piercing tool to "round" each petal. I hold one side of the petal with one hand and with the other hand I place the needle tool on the front of the petal and press my forefinger against the back of the petal. Starting from the center and working toward the edge, I use gentle pressure to "curl" the edge upward. Then I switch hands and shape the other side of the petal.

It will look like this when you are done.

8) Pinch the inside of each petal at the base. (where the petal comes off the center area)

9) Curl the ends (tips) of the petal. I place the piercing tool at the back tip of the petal from the center to the right side. Then I use my finger to roll the edge of the flower over the neddle tool and downward. Then I do the left side.


The petals look like this when I am done.

10) Stack one flower shape on the other, staggering the petals between the petals on the flower below it. Glue
11) Press the center pieces (black stars) into the mat by pushing the stylus into the middle of the piece.
12) Stack the center pieces and glue.
13) Glue stacked center pieces to the middle of the flower and your done :)


Small flower set
These are really easy flowers that make a big statement when you scatter several of them on a project.


1) Cut or punch 2 flower shapes.
2) Emboss the flower shapes by rubbing them with a stylus. Use circular motions.

(This is a different flower but the idea is the same.)
3) Cup the flower shapes by pressing straight down with the stylus into the rubber mat.
4) Place glue in center of one shape and stack the other flower on top.
Try to stagger the petals if possible. (they are really small)

5) Add a stone, bead, or paper dot to the center.

Mumm
This is a really easy paper flower to make (as my paper flowers go). It does take a few steps but to goes together quickly without a lot of shaping and molding.
For a good Mumm you will need about 16 spidery flower shapes in different widths. You can use as many or as few as you like. ( I will have a link to a cut file at the bottom of the post.)

For this flower, I used flower shapes in the following sizes:2 flowers at 2 inches, 2 flowers at 1.75 in., 2 flowers at 1.5 inches, 2 at 1.25 in, 2 at 1 in, 2 of .75 in., and 6 at .5 inch
Stack the flower shapes on a craft mat or plastic.

Spritz with water.

Put the 6 smallest flowers to the side.

Take the larger group of flowers and use your fingers to scrunch up the petals. (yes "scrunch" is the official term LOL) Repeat with the smaller group of flowers.

Push the petals back a little and...

Spread the larger group of flowers out. If the centers are too wet to glue, allow them to dry a little. (if the little flowers are too wet they may need to dry out too.)

OK, starting with the largest flowers glue & stack the large group of flowers. Stagger the petals.


Now, with the smaller group of flowers, scrunch one up like this...

Then put glue on the bottom and attach to another flower shape...


Fold the bottom flower up and
repeat this with the remaining small petals.


Now just put the small group of flowers in the center of the large group


Hope you enjoy this tutorial and make some Mumms of your own.
Here is a link to the cut file. Mumm
Daisies

You can find the videos for my daisies here:
Gerber Daisies - http://www.youtube.com/watch?v=oSv-3NbOAQk
(pictured above)
Uppsie Daisies - http://www.youtube.com/watch?v=6qdRr_m-7AQ
(pictured below)

Open Flower

Here is a link to the video tutorial: http://www.youtube.com/watch?v=ctmUWfrU9QE
I used 3 flower shapes in 1/4 inch increments. (ie 2.5in, 2.25in, 2in)

Any 5 point flower with teardrop shaped petals will work.
Hold each petal at the base (where the petal joins the center of flower).
Curl the petal down by sandwiching the petal between your thumb and a smooth round tool. (ie a needle tool) and slide your thumb and tool down to the end of the petal.
This is similar to curling a ribbon with scissors.

Then stack the flower shapes, glue, and stagger the petals.
I added silver seed beads to the center of mine.
Tattered flower tutorial
Here is a link to the video tutorial: http://www.youtube.com/watch?v=9t6P2-fNH2o

1) Cut 2 large petals and 2 small petals as shown.

2) Ink or spritz pieces if desired.

3) Use paper piercing tool or another smooth, round tool to "curl" the petals of the large flowers down. To do this, hold the base of the petal with non-dominate hand and use the other hand to press the petal between your thumb and the tool. Slide your thumb and tool from the base of the petal to the tip as if you were "curling" ribbon for a package.

Repeat this for each petal on both of the large flower pieces.

4) Next bend each petal up straight up. (about 90 degrees)...


... and then back down again.
The flower pieces should look like this when you are done.

5) Adhere and stack flowers, staggering petals.

6) For small petals, curl up or down depending on the look you want. Stack and adhere in center.

7) Add beads or rhinestones to the center.

Circle Rose
The first scrapbook tool I ever bought was a circle punch. So of course I played around with circles and came up with a rose that is made from them. This flower is a good option if you do not have access to rose shaped cut files or die cutters. (Almost every one has a paper punch, circle cutter, circle die, or cartridge that will cut circles)


 These flowers are all made with twelve 1 inch circles.
You can use any size circles.
(Just remember the smaller the circle, the harder it is to work on. You probably want to start out with 1in to 1.5 in circles)
You might decide to add more than 12 or use less than 12 after you play with it a while. There is NO right or wrong. I made this up. Just use whatever works for you.
1) Place each circle on a rubber mat and use a stylus to rub over them. Make large circle motions with light pressure at first. Then use small circular motions with medium pressure. This breaks down the fibers in the paper and makes it easier to shape later.


2) Now take a smooth round tool (needle tool, skewer, end of paintbrush, etc) and smooth the petals out. Grab the circle with one hand and with the other hand put the smooth tool on top of the petal and your finger on the bottom. Slide the tool and your finger to the opposite edge. Then grab the other side of the circle and do the same thing to the opposite side. This basically curls the left and right sides of the circle. Do this to all of the circles


Now put glue on one side and roll it up tightly like this...


This will be the center of the rose.
4) Next, take another circle, add glue, and wrap around the center piece you created in the last step.


5) Curl the upper left and right sides of all the remaining circles. Place the smooth round tool behind the upper left side (from the center to the edge as shown)


It will look like this:

Then do the same thing to the upper right side.

6) Put glue on the petal and wrap it around the center piece.


I like to make sure I cover the seams on the center piece when I add each new petal. When you get to the edge, bend the upper edge back a little.

7) Continue putting glue on each petal and wrapping it around your center flower. Stagger the petals. Use your fingers to push the edges or the top over a little so they are not completely round and they are not all exactly alike.

I just add a small amount of glue so that it dries quickly. I hold the new petal on for about a minute. That keeps the flower from falling apart on me half way through the project because the glue is not dry.


Keep turning the center piece and adding petals until it is as big as you like it.
The last few petals do not wrap around as much. They are just attached at the bottom and lower edges.


The flower does get pretty thick. It is possible to cut off the bottom edge to cut down on the bulk, but you have to make sure that the petals are glued securely. You may have to glue some of the petals back on after you cut it.
It takes time and practice. It does get easier each time you make one. I probably redid my first flower about 10 times.( so hang in there :)

Remember, there is no right or wrong. Do what works for you.
I roll my petals fairly tight, but they would look just as good if you put them on loosely (I am not sure if that is a word...LOL)
Have fun with it!
Loose Rose Tutorial

Here are the links to the video tutorials:
part 1 - http://www.youtube.com/watch?v=tZjBwFKAYVU
part 2 - http://www.youtube.com/watch?v=4PdkP77fKRo
My Loose Rose Tutorial
(LOL..you can totally see the glue that I used to attach the seed beads right before I took the picture.)
1) Cut 5 petals (the large petals from the tattered flowers)

2) Ink, spray, or chalk if desired.
3) Place flower shape on mat (I use the arm rest that came with our computer mouse pad. You can also use fun foam craft sheets or the rubber mats that you use with embossing plates on your embossing machine.)
4) Use stylus to hand emboss each of the flower pieces. Make large circular motions with light pressure at first. Then go over the petal again with smaller circular motions and medium pressure. Do this to all 5 flower shapes. This breaks down the fibers in the paper and allows you to mold the petals. (see picture below)


It will look like this when you are done.

6) Use piercing tool to "round" each petal. I hold one side of the petal with one hand and with the other hand I place the needle tool on the front of the petal and press my forefinger against the back of the petal. Starting from the center and working toward the edge, I use gentle pressure to "curl" the edge upward. Then I switch hands and shape the other side of the petal.


7) With 2 of the flower shapes, gently pinch the sides of each petal inward, then fold each petal in towards the center one at a time. Fold all 6 petals in then release. Place one flower shape on the table and use your fingers to gently press all the petals in like this
 This will be the center of the flower.
Do the same thing for the other flower shape, but don't close the petals quite as much. It should look something like this.

8) Curl the ends (tips) of each petal of the remaining 3 flower shapes. I place the piercing tool at the back tip of the petal from the center to the right side. Then I use my finger to roll the edge of the flower over the needle tool and downward. Then I do the left side.
9) Bend each of the petals up. For one set, bend them about 45 degrees like this

Bend the next set a little less, like this

And the last set just a little bit. Like this

The shapes should look something like this.

10) Take the center piece (that tight little bud on the far right) , open the petals, place beads in the center, then fold petals in again.


Now put glue on the bottom of each piece and stack on top of the next, staggering the petals.


Ta-Da!
Your done :)
Tools I use for making paper flowers - http://www.youtube.com/watch?v=UjJqmhjUMZQ
Tips and techniques - http://www.youtube.com/watch?v=WQeOrWMhEUI
Arranging paper roses - http://www.youtube.com/watch?v=6Avng2cJaYU
Leaf tutorial - http://www.youtube.com/watch?v=D7i4NzQ4dog
Adding leaves - http://www.youtube.com/watch?v=wi6FQnp6iek
I have 3 different sets of rose files and instructions available to purchase. You can go to my home page and look at the side bar on the right or you can find them in my Etsy shop.
4 comments:
Lovely tutorial Jani!
newbies like me can learn a lot from you.
TFS.
Regards,
Vithya
fantastic tuts!! and will try a few the one I want to learn is the rose...wish me luck...lol
Så mange pene blomster du har laget og så fantastisk godt du forklarer hvordan det gjøres og med gode foto i tillegg. Tusen takk. Jeg vil prøve å lage roser jeg også, men tror jeg starter med noe enklere først:-) Ha en fin uke.
Your instructions are so very thorough yet awesomely simple!! Thanks SO very much!!
Post a Comment