Check out this AWESOME give away over at Creating From the Heart.
Melissa is giving away a huge gift card, a set of Copics, and an airbrush system.
You don't want to miss out on this!

Saturday, December 31, 2011
Friday, December 30, 2011
Another Easy flower video tutorial


I made another "easy flower" tutorial video. I don't really have a name for these flowers. You are welcome to suggest one :) You can find a picture tutorial for these flowers under the "easy flowers tutorials" tab under my blog header. Just scroll down to flowers numbered 2 and 3.
Here are the Easy Flowers files.
Speaking of blog headers... I LOVE the new header I made. I used the "long flourish frame" cut file that I recently made and colored it with some of my new Distress stains. The stains are similar to the inks but easier to use when you want to color the entire surface. Then you can ink the edges with the regular foam blending tool. SO COOL.

Enjoy the video and be sure to check back tomorrow for a chance to win some of my handmade flowers :)
Thursday, December 29, 2011
Easy Multi-layered Flower Video

You may have already seen my picture tutorial for this easy flower with lots of layers. I posted it several months ago and I placed it on the "Easy Flowers" tab located under my blog header.
Now I have made a video tutorial for it also.
Here is a link to the updated cut file and templates. (It is also called "basic daisy" file) If you have downloaded it before, you may want to replace the old file with this new one. I fixed a few things.
Hope you enjoy the video.
Monday, December 26, 2011
Poinsettia video tutorial
Wooo Hoo! I finally got a video camera and made made my first paper flower tutorial!


I was nervous at first but then again it is exciting at the same time.
I know a lot of you want to see my roses. Considering the fact that I am just learning how to video, I am going to start off with some of the easier flowers. This will also help you get a few of the techniques down as well.
The first video just shows examples of some of my flowers and the tools I use to make them.
The second video is the Poinsettia tutorial.
I have added some information on the tabs that are just under my blog header. Look for the tab that says, "helpful info" (or click on the link here) It explains SVG files, digital die cutting machines, and how to resize PDF templates.
I will be doing more paper flower tutorial videos during the the next couple of weeks.
You can subscribe to my YouTube channel and get emails when I have posted each new tutorial. My YouTube user name is "lovepapercrafts".
I had that account before I had a blog and now I cannot change the user name to Paper Compulsions. Sorry if that is confusing.
Thee poinsettia files and round scalloped box files are available on my Etsy store.
Enjoy! Please leave a comment here or on YouTube and don't forget to subscribe to my YouTube channel.
Tuesday, December 20, 2011
Last challenge for CUWC
Well, this week's challenge at Cuttin' Up With Class will be the last. I have had fun and enjoyed it while it lasted. I will be forever grateful to the DT members that made wonderful projects every week. I will still keep in touch with them and hopefully be joining them for other projects in the future.
The challenge is to use the gingerbread file in some way on any project.
Since this is the last challenge, I made 3.
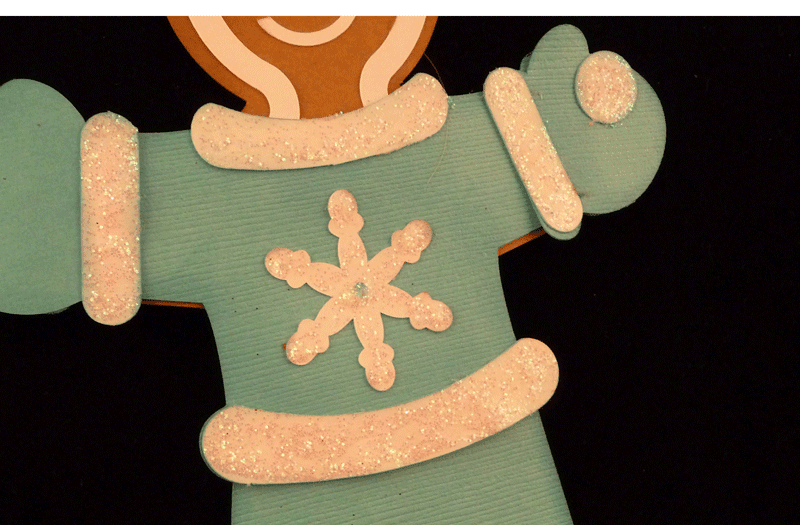
A gingerbread girl in the snow with some warm accessories...

 (she has glittery trimming)
A Santa gingerbread man...
 (He has fake snow on his trim)
And an adorable baking gingerbread man with lots of goodies to share.


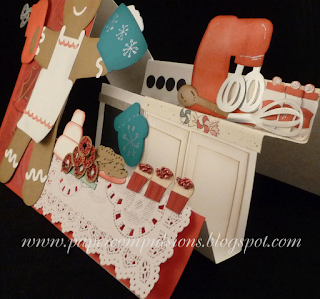


Complete with glittery doughnuts, chocolate chip cookies, and beaded cupcakes. The "table cloth" is a paper doily. (That is an oven mitt in the back next to the stove.

It is a step card I modified to form a cabinet with a built in stove. (get a load of the burners...LOL)

I will have this file available in my Etsy store soon. I have to work out a few kinks first.
I hope you enjoy this and get inspired to "Cut Up" with us this week at CUWC.
The challenge is to use the gingerbread file in some way on any project.
Since this is the last challenge, I made 3.
A gingerbread girl in the snow with some warm accessories...

A Santa gingerbread man...

And an adorable baking gingerbread man with lots of goodies to share.


Complete with glittery doughnuts, chocolate chip cookies, and beaded cupcakes. The "table cloth" is a paper doily. (That is an oven mitt in the back next to the stove.

It is a step card I modified to form a cabinet with a built in stove. (get a load of the burners...LOL)

I will have this file available in my Etsy store soon. I have to work out a few kinks first.
I hope you enjoy this and get inspired to "Cut Up" with us this week at CUWC.
Saturday, December 17, 2011
Calendar for the New Year
I needed to make a little something for a few friends. I decided to make desk calendars. They can always be used and can be left out all your long.

The calendar cards fit into the holder by slipping into 3 little slits I cut into the paper and hid with paper flowers. (You know I just had to add some paper flowers LOL)
There is a box on the back that holds the calendar cards.

The decorative frame that holds the cards is not my file. (If you recognize it, please let me know so I can give the designer credit) I can offer you the cut file for the little flowers and a pdf of the calendar pages though.
Small flowers calendars
Here is a diagram for the box. You can download this file along with the cut file and template for the box. (This cut file is only in svg. If you need a different format just email me at papercompulsions@gmail.com .
Here is a diagram for the box. You can download this file along with the cut file and template for the box. (This cut file is only in svg. If you need a different format just email me at papercompulsions@gmail.com .

The decorative paper I used is from Graphic 45 Once Upon a Springtime.
The flowers were cut from white card stock and inked with Tattered Rose distress ink.
Friday, December 16, 2011
Paper Cutz Challenge Hearts for Christmas
This week at Paper Cutz, the challenge is:
"All Hearts Come Home for Christmas" Make a card, LO or craft project for Christmas using Hearts, and any colors you'd like.
Here is a heart shaped card I made with one of my poinsettias.


"All Hearts Come Home for Christmas" Make a card, LO or craft project for Christmas using Hearts, and any colors you'd like.
Here is a heart shaped card I made with one of my poinsettias.

I cut it from ivory chard stock. Then I inked it with Festive Berries, embossed it, and inked the edges with Fired Brick. Last, I rubbed the Fired Brick ink pad directly on top of the card front. I am loving this technique.
I used the same ink colors on the poinsettia so it matches perfectly.

You can download the "Heartfelt Christmas Wishes" caption here.
Join us over at Paper Cutz for the All Hearts Come Home for Christmas challenge.
Thursday, December 15, 2011
Secret SantaGifts
I have been so busy making crafts that I have not had time to post any of them yet. Here are a few things I sent my Secret Santa from The Crafter's Cafe group.
She like fairies and I just happened to have some Graphic 45 paper from Once Upon A Springtime. I made a perfect gift box for some of my handmade paper flowers.


It is hard to tell in the picture, but I put paper lacquer on the fairies to make them stand out a little. It is really cool in person. I also added lots of little pearls. (Once I got started it was hard to stop LOL) I cut the flowers above from white cardstock and inked them with Tumbled Glass and
Tattered Rose Distress Inks.

Of course, I just had to make a few Christmas flowers so I made s cut file for a poinsettia.


The Poinsettias were cut from white card stock. I inked the petals with Festive Berries and Fired Brick. The leaves were inked with Shabby Shutters, Pine Needles, and Forest Moss. (It takes a while but it is soo worth it) The inside stamen were inked with Wild Honey and Pine Needles. (I am so loving my distress inks!)
Good news! My hubby let me open my present early so I will be working on a video tutorial for the poinsettias!
Wooo Hooo!
Wednesday, December 14, 2011
Christmas card 2011
I make so many cards during the year that I want to really go all out for my Christmas cards. Here is my card for this year.


It is a tri-shutter card. You can get more details on how to make a tri shutter card here.
When I look at this card, i see the outward beauty as well as an inward beauty. As many of my followers know, I broke my hip when I was 11, had it replaced at 36, and have had severe extensive nerve damage ever since the hip replacement 5 years ago. (yes, if you do the math, I am 41) As you can imagine, the past few years have been extremely difficult and painful. I have had to live with pain on a daily basis that most people will never experience in a lifetime. I can no longer physically do so many things that we usually take for granted. I have had to mourn the fact that my life is never really going to be the way I imagined or wanted. At first I tried to tell God that I was just not string enough to handle all the pain and disappointment. God has allowed me to realize that I don't have to be string enough, because He is strong and through my weakness He will be my strength. My situation has caused me to grow closer to Him and to see so many ways that God takes the things that are so painful in our lives and make something beautiful out of it.
What does all this have to do with my Christmas card??? Well, see all the pretty silver foil paper that I have cut and embossed? That is the inside packaging of the Lidocaine pain patches that I put on every day.

 The medicine never actually touches the package so it is safe to use. I cut the pouch open and it is a light weight paper that has a foil lining on one side. Everyday, as I apply a pain patch , I have learned not to focus on the obvious pain, but to look at the cool new craft product I can use. I am constantly reminded that even in my pain, God can make something beautiful out of my life just as I can make something beautiful out of the package.
So when I look at my card, I see a year's worth of pain patches but a lesson that will last me a lifetime.
Here are a few more pictures. I used a Sizzix embossing folder for the dry embossing and a Stampabilities "snowflake background" stamp with Stazon ink and silver embossing folder for the heat embossing. The snowflakes and labels are cut files that I made in Inkscape.


Hope you enjoy looking at this.
I have some cool new poinsettias that I made to share tomorrow. I am getting a video camera for Christmas so I will finally be able to make tutorials for my paper flowers. (just as soon as I learn how to use the camera that is...LOL)


It is a tri-shutter card. You can get more details on how to make a tri shutter card here.
When I look at this card, i see the outward beauty as well as an inward beauty. As many of my followers know, I broke my hip when I was 11, had it replaced at 36, and have had severe extensive nerve damage ever since the hip replacement 5 years ago. (yes, if you do the math, I am 41) As you can imagine, the past few years have been extremely difficult and painful. I have had to live with pain on a daily basis that most people will never experience in a lifetime. I can no longer physically do so many things that we usually take for granted. I have had to mourn the fact that my life is never really going to be the way I imagined or wanted. At first I tried to tell God that I was just not string enough to handle all the pain and disappointment. God has allowed me to realize that I don't have to be string enough, because He is strong and through my weakness He will be my strength. My situation has caused me to grow closer to Him and to see so many ways that God takes the things that are so painful in our lives and make something beautiful out of it.
What does all this have to do with my Christmas card??? Well, see all the pretty silver foil paper that I have cut and embossed? That is the inside packaging of the Lidocaine pain patches that I put on every day.
So when I look at my card, I see a year's worth of pain patches but a lesson that will last me a lifetime.
Here are a few more pictures. I used a Sizzix embossing folder for the dry embossing and a Stampabilities "snowflake background" stamp with Stazon ink and silver embossing folder for the heat embossing. The snowflakes and labels are cut files that I made in Inkscape.


Hope you enjoy looking at this.
I have some cool new poinsettias that I made to share tomorrow. I am getting a video camera for Christmas so I will finally be able to make tutorials for my paper flowers. (just as soon as I learn how to use the camera that is...LOL)
Tuesday, December 13, 2011
Snow Much Fun
My DT for this week's challenge at Cuttin' Up With Class also happen to be one of my Christmas cards for this year. I have included snowflakes in my cards for the last two years and this year is no exception.

For the background, I used a Sizzix embossing folder that I rubbed with Broken China Distress Ink then sprayed it with Abominable Snowman Glimmer Mist. (You can't tell from this photo, but it has a great frosty look.) I put the paper in the embossing folder and embossed it. I used Broken China around the edges with a direct to paper technique.
The paper snowflakes are cut files that I have available in my Etsy shop. The small blue jeweled snowflake was a leftover from an old Christmas card project. I purchased the pretty little jewels from Oriental Trading Co.
I have been so busy making this next Christmas car that I have neglected my blog and blog buddies. They ended up being more work than I really wanted but I like them.

Here is a look at the front, but you will have to wait until tomorrow to see more and find out all the details :)
Be sure to go by CUWC to download the files and play along with the challenge this week.
Tuesday, December 6, 2011
Fireplace Card Challenge at CUWC
Cheryl from CAFExpressions has a made a cut file for us to use this week at Cuttin' Up With Class. It is a really fun file. Here is the card I made.


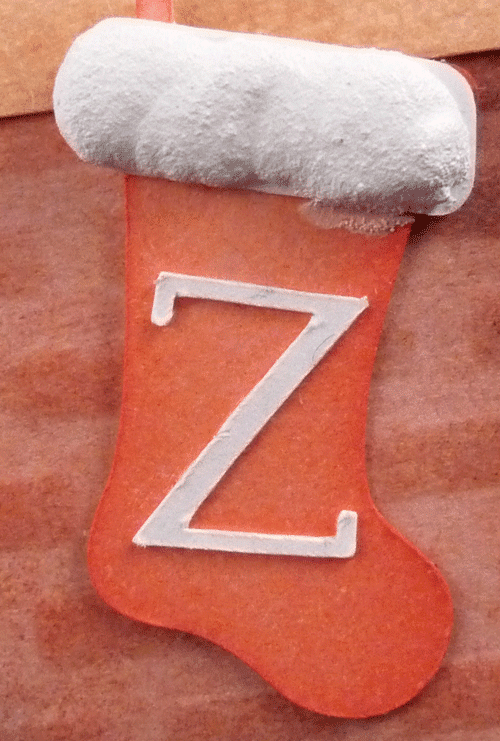
I made a little Christmas stocking file that you can get at the CUWC site.
 I used fake snow for the top.
I used the pain patch for the fireplace screen and embossed it with Musical Flourishes.
The rest of the pieces were cut from white cardstock and inked with Distress Inks.
(Barn Door, Fired Brick, Black Soot, Pumice Stone, Wild Honey, and Rusty Hinge)
The fireplace is embossed with an old Fiskars embossing plate that looks like bricks.
You can get the fireplace card file at Cheryl's blog, CAFExpressions, and you can get the stocking file at CUWC.


I made a little Christmas stocking file that you can get at the CUWC site.
I used the pain patch for the fireplace screen and embossed it with Musical Flourishes.
The rest of the pieces were cut from white cardstock and inked with Distress Inks.
(Barn Door, Fired Brick, Black Soot, Pumice Stone, Wild Honey, and Rusty Hinge)
The fireplace is embossed with an old Fiskars embossing plate that looks like bricks.
You can get the fireplace card file at Cheryl's blog, CAFExpressions, and you can get the stocking file at CUWC.
Saturday, December 3, 2011
How great my joy

I had so much fun making these cute little penguins. I made 7 styles of penguin cut files. Two of them are included in this project. I recently bought more Distress Inks and wanted to try them out. I have also been watching videos on different techniques with these inks. So I cut all the shapes out of white cardstock and went to town coloring.
I used Black Soot for the bodies and eyes and Wild Honey and Rusty Hinge for the feet and beaks. Then I used Festive Berries (one of the new seasonal colors for winter) on the Santa hat, the top layer of Joy and the top layer of the holly berries. Next I stamped with the same color onto the Joy caption. I used Fired Brick on the back layers. I like that it is just a little darker.

Shabby shutters is the color on the top layer of holly leaves and Peeled Paint on the back layers.
For the white parts of the Santa hat I edged them with Pumice Stone and then Weathered Wood then misted them with Glimmer mist to soften the color and add some shimmer. Then when they were dry I embossed them with swirls.

For the blue headphones. I heat embossed them with silver then applied Faded Jeans.

Now for my favorite part. For the green headphones, I inked Shabby Shutters on with the blending tool then embossed with a Sizzix folder. I took the Peeled paint and rubbed it directly onto the raised embossed parts. Then I went around the edges with the Peeled Paint and the blending tool.

I really like that look! I will defiantly be using this technique a lot.
Well, I hope you enjoyed seeing this as much as I enjoyed making them and sharing the info.
I am not sure I am ready to try Tim Holtz's Christmas tags yet, but I will certainly be playing around with the techniques.
Friday, December 2, 2011
Paper Cutz Challenge - Jingle Bells
This week's challenge at Paper Cutz is
Jingle Bells
#118: "Jingle All the Way!" Make a card, LO or craft project using a stamped, digital stamp or Cricut cut image of Jingle Bells. Use any colors you'd like.

I made a flat jingle bell design, some holly, and used a cool font to make the caption.
I added some red gems to the holly berries because they needed a little something.
I used the pain patch package for the bells since it is foil lined.
You can download the files for this card here for a limited time.
I have been playing around with an idea for a 3D jingle bell, but have not come up with one that I like yet...but of course I'll keep trying LOL
Grab some jingle bell decorations and join us over at Paper Cutz.
Monday, November 28, 2011
November Show and Tell at CUWC
Man, I am not sure where this month went, but it seems to have flown by. Since it is already the last Tuesday in November, it is time for a
You can link up ANY project you have made
AS LONG AS...
You make a NEW POST mentioning that you are linking it up at the
and
provide a link back to CUWC
then
You must VISIT at least 3 other blogs in the "class" and say you came by from CUWC.
That's all :)
Here is my project

It is a snowflake ornament that I made from 3 of my new snowflake files.
(available in my Etsy shop)
Here is a better view of the 3 different snowflake cuts.

For this ornament, I made 8 sets of snowflakes, scored them all in half,
stacked the 3 different flakes on top of each other,
then glued all 8 sets together.
Then I misted all the sides with Glimmer Mist and tied a decorative thread around the top.
(I promise it is so much easier than it sounds)
Here is a picture for the visual learners like myself...

I got this idea from Lovely Linda at Lovely Linda's Craft Central.
Check out her beautiful ornaments .
Be sure and link up something this week at
Embossed Snowman
I got some new toys and just had to play with them. LOL
I got a set of embossing folders from Sizzix, There is a snowflake background, a snowman, a gingerbread man, and a caption (warm wishes). This is a quick card I put together.

I rubbed Stormy Sky distress ink on the embossing folders then embossed. I added some color to the snowman with markers and cut out the snowman and the caption.

I love this little guy.
I also wanted to mention that Custom Stamp Place is having a sale.
They have some really cute designs that you can add your name too and use to stamp your cards.

Subscribe to:
Posts (Atom)