Showing posts with label box. Show all posts

Tuesday, June 3, 2014

Update on Teacher Appreciation and Graduation Projects

Hello crafty friends!

I have been really busy with projects but have not posted many of them. LOL
Some of them will be coming up soon on the Scrapadabadoo blog.
I thought I would post and update on some of the other projects though.


I made a couple of apple boxes for a customer who needed teacher appreciation gift boxes. They ended up being pretty big (8 inches by 4 inches). I used chipboard to construct them so they were very sturdy.  Then I covered them in paper.

Speaking of the paper... I found this stash of school themed pattern paper recently. It has been packed away in a box in the garage for SEVERAL years. LOL It was perfect for the box so I used it all up.

Any guess how old this paper is???
5 years?...no
10 years?...no
I bought it in 2002! Yes, it is 12 years old. 
Can you believe that!
My only excuse is that it got packed away years ago when we moved back to Texas from New Mexico and just never ended up getting unpacked, LOL

Oh well, I found a nice place to be now and looks great for this project. haha
I used my old school cut files but if anyone is interested in how or wants new cut files, let me know and I will add them to my Etsy listings.

I also made cut files for graduation luminaries and made several. (just never posted LOL)
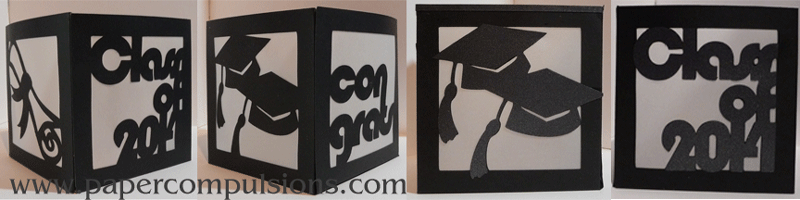
Added some cutout pieces to them too.

Those pieces would make great decorations too.

Made a few of my grad cap boxes too.


Made an ADORABLE little chick with Flower Soft and a plastic egg but was hurting too much to post it around Easter.


So CUTE!

More projects coming soon.
I may even dig up a few more that have never been shared.

enjoy

Sunday, April 13, 2014

Decorated Gift Box


Hello my crafty friends. I did not realize it had been so long since I posted. I have been busy crafting and taking pictures but forgetting to post. Oh well, I promise to catch up.

I made this lovely decorated gift box for the Scrapadabadoo FB challenge. Last Monday they started having challenges every other Monday. It is all just for fun. No pressure. The current challenge is a grid challenge where you pick three items in a row from the grid.
I decided to pick the 3 on the left; flowers, ribbon, and bows.

I cut the gift box and the decorative panels out with cut files that I made. You can get the cut files here.  There is also a 12 minute video if you are interested in how I put it together.


 I made the flowers using my Open Rose and Pretty Flower files and techniques.


I was lucky enough to be chosen for the Scrapadabadoo Design Team !
I will be posting lots of new projects soon. 

Papers Used:


Friday, February 22, 2013

Altered Paper Mache Box with Open Flower

I altered this paper mache box back in August before we moved to a new house. In all the business of moving, I never shared the box.


I used my Diamond Edged Designs cut files for the doilies and borders. Added ink and pearls then topped it off with one of my handmade Open Roses.


Here is a really short video showing the finished box. (about 3 minutes)
The names of the cut files and inks are mentioned in the video. 

Friday, June 22, 2012

Pocket watch 2.0

Well, give me long enough and I can think of a dozen different options to most craft projects. Creativity is not my problem...narrowing my focus and editing down is where I have trouble. LOL


With that said, here are the new improved versions of the pocket watch I introduced last week.


I revised the pocket that I made last year for Father's day to hold the pocket watch.


Here is a video showing how to assemble the pocket..
(If you have the files from last year, I changed the holes slightly on this one)


Next, I added a small box to the watch...

It is difficult to see it in the picture above, but you can see it in the middle of the picture below.


Then I added an acetate cover and put the clock face in the bottom of the box.


Then, it dawned on me that the original pocket watch needed a place for a picture.


( yes, that handsome young man is my son)


Here are videos of assembling the box and a few of the options that can be used with these files.


I will be working on a motorcycle cut file to add to the front.
For now, the cut files with the wildlife coverscan be purchased at my Etsy store.

Monday, May 28, 2012

Graduation Cap Box

Hope you are all having a wonderful Memorial Day.
This is not just a day to have a day off work, but to honor the men and women who have served in the military and have given their lives for our protection and freedom.
We reap the benefits of their sacrifices.

Thanks you to all the men and women who have served our country!


On another note... 
I have seen a few of these graduation cap boxes around and just had to make one for my self.


It is fairly easy to put together.

Here is a video on how to assemble this box


 and the video I shared in my last post on how to make a tassel.


These files will be available on my Etsy shop.

Tuesday, April 24, 2012

Rose box

My friend Christel at Scrappin' Sista has a swap every month. I have participated in several of them in the past, but took a break for a few months because of the invitations I have been working on. Well, this month's challenge was to make three handmade flowers and an altered box. That was right up my ally so it was a perfect time for me to jump back in...


made 3 open roses that I cut from white cardstock and inked with Victorian Velvet and Worn Lipstick Distress inks. The leaves were inked in Shabby Shutters, Peeled Paint, and Evergreen Bough (Winter seasonal). I made several little yellow flowers too but they just did not go very well with the rest of it by the time I was done so I will save them for another project. I opted for several pearls in various sizes to finish it off.


I used a paper doily on top and one of my shell borders cut files on the sides.
I felt like that was the perfect little touch.


My swap partner and I have very similar tastes so I feel like she will really like it.
I had a lot of fun making it and will probably make one for myself. (My DH bought 2 paper mache boxes when he went to the store for me. He knows me so well... LOL...He's a keeper :)


Hop on over to Scrappin' Sista and look for the "SWAPS" tab under her header to get more info and join in on May's swap.

Monday, March 5, 2012

Boxes and Books

I had a bad week-end pain wise so I am just now getting to explaining these boxes that look like books. (not that any one was holding their breath until I posted about it ...LOL)


I ended up making several different videos. At first I was r-e-a-l s-l-o-w , then I took pain meds and was way too fast. LOL I discarded some of those videos and made new ones. So, this is a potpourri of information on the books that look like boxes and how to make a plain gift box.
Hope I made sense.


 I used Graphic 45 papers on them along with the Graphic 45 Signature Series Core-dinations paper.


This one started out as a real box from the G45 "Staples" line. I altered it and covered it to make it look like a box.


I made the smaller boxes/books from card board and card stock.

I just love the little library card graphic that came on one of the papers from the ABC Primer line. I matted it and placed it inside the front cover.


I used some of the papers from the G45 Tropical Travelogue for the inside cover and the bottom of the front cover of this one. I added one of the "This book belongs to " tags that come on the same sheet as the library tag.


I embossed the spine of this book with a thin Cuttlebug embossing folder.


Here is a video I made on Friday to show more of the decorations. (Keep in mind that I was hurting pretty bad so my mind was just not working well. :)


Here is a short video on how to make a basic box. (i.e. gift box)


...and here are 2 videos showing how to make the book/box. It was one 17 minute video that I had to break down into 2 parts.


How to make the book/boxes


                            part 1
                        part 2 


Thanks for hanging in there!

Friday, February 3, 2012

Inking embossed paper

Hey there! I have one last heart shaped box to show. (Hope you are not tired of them yet)
This is the one I made in the video on my last post.


The matching card is in front and the box lid is behind it. The bottom of the box is peeking through in the very back.


I made a video about how I decorated the boxes. The assembly video ran so long that I did not include it.

While I had everything out, I went ahead and did a short video on how to ink the embossed area like I did on this card.


I am entering this box in the Decorate to Celebrate -  Valentine challenge (Thanks Rhonda:)

Thursday, February 2, 2012

Video for Heart Shaped Box


Well my crafty friends, I intended to make this video several days ago. Well, actually, I did make a video several days ago...just not a very good one. After many attempts, several hours of reworking the cut files, and 4 boxes later...I present to you a video tutorial of how to make my heart shaped box. It still has some mistakes, but at this point whatever happened in this version got left in. There is a really good blooper at the very beginning :)


There are 2 parts


Video 1


Video 2


Here are some close up pictures


This is the box with the card.

This was cut from cream colored cardstock and inked with Fired Brick distress ink.

 I did a video on how to ink the embossed area but it will have to be edited.


I don't have any pictures of the red, black and white box yet. They will be coming soon :)


Cut files and templates will be on my Etsy shop along with these finished boxes.

Sunday, January 29, 2012

Heart Shaped Box

With Valentine's Day fast approaching, I made a decorative heart shaped box.


I used some old Anna Griffin paper that I stocked up on a while back. Along with colored cardstock and white cs that I inked. (Antique Linen and Fired Brick) Then I topped it of with one of my handmade open roses. (I have made a tutorial put I need to make a few changes and my body just has not cooperated with me this week...so it is coming soon)


Check it out, I even stamped the inside. (notice I did not get a close up picture of the stamped areas. LOL


I added a decorative heart flourish to the side.


It will be perfect for sending some craft goodies to my "secret sweetie" swap group over at The Crafter's Cafe'.


The cut files, templates, and video will be available tomorrow.


I am entering this project in:


Papercrafting Journey - Florals


Whimsical Wednesday - love themed home decor

Friday, November 18, 2011

Paper Cutz Challenge Turkey


The Paper Cutz challenge this week is 


#117: "Let's Talk Turkey!"  Make a card, LO or craft project for Thanksgiving, using a stamped, digital stamp or Cricut cut image of a Turkey . Use any colors you'd like.


I made this turkey treat box.


Here is a close up of the turkey before I added the "gobble" captions.


It is hard to tell from the picture, but the dark brown cardstock is lightly embossed. The light brown is Bazzill that I ran through my printer and printed out the gobble captions and the turkey tracks digi. (I am still learning how to do digi's so any comments would be appreciated.)  The patterned paper is K & Co (I am ALWAYS drawn to the K & Co lines no matter how many brands I look at...LOL)


Here is a link to download this digi file of the turkey tracks


The turkey cut file and digi stamp are available to download at my challenge blog, Cuttin' Up With Class. The "gobble, gobble, gobble" caption is available on CUWC also.


Check out what all the other Paper Cutz DT members have come up with and play along with us.


I also have a "Gobble 'til You Wobble" blog hop tomorrow. You won't want to miss this project :)


Photobucket