Showing posts with label flower soft. Show all posts

Monday, July 7, 2014

More is not Always Better

Well, I never thought I would say this, but more glitter is not always better.

My previous post showed the Glass Bead Gel with Glitter already in it. I started wondering what would happen if I added even more glitter...

I tried adding Stickels Dry Glitter - Stardust to the glass beads.
You may remember that the Faber-Castelle Glass Bead Glitter Gel was semi transparent and allowed the pattern paper to show through.
Well apparently if you add the Stickles dry glitter, you can not longer see through it.

Here you can see the stickles over the glass bead gel that I stenciled on using a Crafter's Workshop stencil. The butterfly is also covered in the glass bead gel and Stickles glitter. You can also see where I just added dots of glue and glittered them. Both techniques look the same so the glass beads are just adding texture and nothing else here. It is OK but just was not what I was hoping for.

I did add some of my tattered flowers along with some Flower Soft that adds some lovely texture and fills in the gaps very nicely.

The flowers, Flower Soft, and ribbons were all colored with Tim Holtz Distress Stains.
The flower centers are filled with a cool product from Viva Decor called Ferro -Graphite.
(I will be showing more with the Ferro soon)

Well the Stickles did no give the look I was hoping for, but I did have fun playing with the products that I got from Scrapadabadoo and have lots of other crafty ideas for these products.

Thursday, June 26, 2014

Scrapadabadoo Sizzling Summer Blog Hop

Welcome to the
Scrapadabadoo
If you are just coming across the hop, you will want to go to the
Scrapadabadoo Blog and start from the very beginning.

My bike was a project that just sort of grew as time went on.
Ever heard Leonardo da Vinci's quote,
"Art is never finished, only abandoned"
Well either that is the case or else I "just don't know when to leave well enough alone."
( I will let you be the judge.) LOL

I knew I wanted to use the Prima Stationer's Desk paper pack
because it was my favorite at the time I started working on this.
(my hubby claims I pick a new favorite every time I see a new paper line. LOL)


Of course I knew I wanted to make several handmade paper roses.
They were cut from white cardstock using my own cut file and digital cutting machine.

Next I decided to stain some ivory trim using Aged Mahogany stain.
Then I got the idea of using teal colored seam binding behind it for more contrast and color. I used TH Peacock Feathers distress stain for that. 
(I have an old video on how to color seam binding here.)
I used 2 rows of the seam binding on the top and bottom then covered them with the decorative trim.
I happened to have some Swarovski crystals in my stash that where the perfect colors.
I hotfixed them on.


I lined the inside and outside of the big wheel frame with the Stationer's Desk paper which added color and gave me something to glue the other embellishments onto.
I added paper to the back and "precision" cut some of the roses from the paper line.
The fussy cut sections were layered into the frame.
The top area needed something.
If you know me, butterflies are usually my answer. LOL

I used a really old paper punch and some of the Prima cloth covered wire to allow my little butterflies to flitter about.
Of course they had to had a little Diamond Stickles. :)


Next I added one of my Detailed Butterflies that I cut from white cardstock and colored with Aged Mahogany and Autumn Maple Crimson. The added some touches of Stickels.


Since I had the wire out I got a good idea to wrap the handles and body of the Penny Farthing. At least it sounded like a good idea until I realised how long it would take. LOL

 
(if I had taken the bike off the base like Debi did,
the wire wrapping would not have been as difficult. LOL)


Then the bike sat on my desk for a while.
It just did not quite seem finished to me.

It finally dawned on me that it needed an adorable little bird to sit on the seat.
So I got out the Air dried clay and ivory Flower Soft 
I used the same colors that I mentioned for the seam binding and trim. 
(There is a new video on the Scrapadabadoo Crafts YT
channel on how to color Flower Soft.)

I just love this little guy!

Thanks so much for visiting my blog!

Be sure to follow along with the blog hop and collect all the secret letters.
Once you collect all 11 letters you can unscramble them to form 2 words.
Email your answer to scrapadabadoo@comcast.net
June 27th to July 1.

Scrapadabadoo will be giving away a Prima Bike frame to one lucky winner
and 2 more lucky winners will receive a $20 gift card to Scrapadabadoo!


You can always purchase your own Prima bike at this link Prima Bike Frame .

Your next stop is
Zandra  http://www.scrapstobeautybyzandra.blogspot.com/ 

Tuesday, June 3, 2014

Update on Teacher Appreciation and Graduation Projects

Hello crafty friends!

I have been really busy with projects but have not posted many of them. LOL
Some of them will be coming up soon on the Scrapadabadoo blog.
I thought I would post and update on some of the other projects though.


I made a couple of apple boxes for a customer who needed teacher appreciation gift boxes. They ended up being pretty big (8 inches by 4 inches). I used chipboard to construct them so they were very sturdy.  Then I covered them in paper.

Speaking of the paper... I found this stash of school themed pattern paper recently. It has been packed away in a box in the garage for SEVERAL years. LOL It was perfect for the box so I used it all up.

Any guess how old this paper is???
5 years?...no
10 years?...no
I bought it in 2002! Yes, it is 12 years old. 
Can you believe that!
My only excuse is that it got packed away years ago when we moved back to Texas from New Mexico and just never ended up getting unpacked, LOL

Oh well, I found a nice place to be now and looks great for this project. haha
I used my old school cut files but if anyone is interested in how or wants new cut files, let me know and I will add them to my Etsy listings.

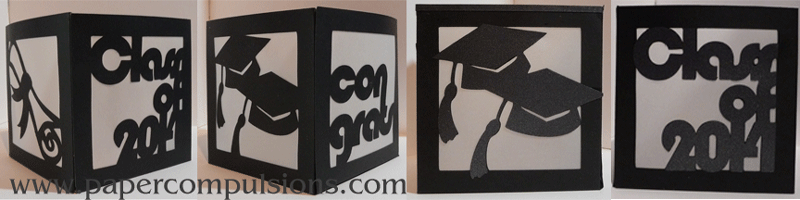
I also made cut files for graduation luminaries and made several. (just never posted LOL)

Added some cutout pieces to them too.

Those pieces would make great decorations too.

Made a few of my grad cap boxes too.


Made an ADORABLE little chick with Flower Soft and a plastic egg but was hurting too much to post it around Easter.


So CUTE!

More projects coming soon.
I may even dig up a few more that have never been shared.

enjoy