Showing posts with label svg. Show all posts

Friday, May 31, 2013

Fleur De Lis Cross


 Made some cards for my church and a Fleur de lis cross cut file. The top layer is embossed and looks really cool.

You can download the free cut file by going to the link below.

Fleur De Lis Cross


Saturday, September 3, 2011

Scrumptious Sweet Blog Hop


Well welcome to my blog. Aren't you just loving the
Scrumptious Sweet Blog Hop?

If you are just starting, you will want to go to Angie's at Scrappin' Memories  & start from the beginning.

Here is the Hop list in case you get turned around.

Jani -  http://papercompulsions.blogspot.com/ +++You are here+++


First of all...
I want to wish my blog friend Tammy a very happy birthday!
(Be sure and leave her a b-day comment when you go by her blog in a few minutes :)

In honor of Tammy's birthday, I have this fun group of birthday captions you can download.


Have you ever made a project and it just did not come out the way you planned?
That is what happened with my first project. I thought ,"how cute would a 3D gumball machine be."
Sounds cute. The files took a while to figure out and when I thought I had it together, it was a little disappointing.

It just needed something else.
(It does not work like a gumball machine. It is just a round box.)

I tired to add a stand.

Still not quite right.
I tried to add ribbons and bows.Still not quite right.

So I made something else.
(I was very happy with this one)


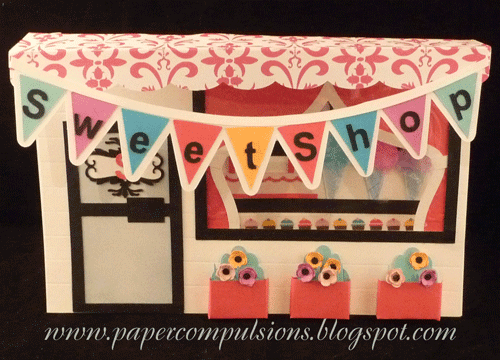
It is a step card that I converted to a SWEET shop.

(See the tab marked "step cards" for more info and a cut file for a generic side step card.


Go ahead and take a closer look.
Those cupcakes at the bottom of the display window are actually a ribbon that I got from Celeste. (she was your 4th stop on the hop over at Touched by a Butterfly) Thanks Celeste!
On the shelf above is a cake and some snow cones. What looks like sugary goodness is actually cotton balls sprayed with alcohol inks. ( I mix rubbing alcohol with several drops or re-inker in a medicine bottle)

If you  get on your tip toes and really press your nose to the glass ( or crafting plastic in this case), you'll see even more goodies.


The best thing is that these sweet treats are "FAT FREE" :)

Here is an other shot of the little canisters in back.

And of course, I just HAD to put some paper flowers on my project.

I should mention that the beautiful label on the door is not one of my files.

I got that from Paulo over at MTC SCAL E-files

Well I hope you like it as much as I do.


If you would like the SVG cut files and /or PDF templates & instructions for the Gumball Machine and the Sweet Shop:

1) Be or become a follow my blog.
2) Leave a comment or email me at papercompulsions@gmail.com
and request them.

Thanks for coming by! I hope you enjoyed your visit.
Your next stop is Melin over at Cooking With Cricket.


Saturday, August 27, 2011

School house box


Well, I finally finished one of the projects I have been working on. It is a school house box. 
The box it self is about 5 1/2 by 4 1/2 and it sits on a "grass" base that is 9 1/2 by 7 1/2 inches.
I think it turned out so cute! (if I do say so myself...LOL)


And look inside the bell tower...


How cute is that! You know how I love the little details :)


Look at these little flowers...
...(because I HAD to include paper flowers) I got my inspiration for the flowers from the little Lego flowers. Out of the literally hundreds of Legos my son used to play with, of course I focused on the one or two flowers that cam with one of the sets. :)


Here is a shot of the platform without the box.
Don't you just love that fence?


Here is the box without the platform.
Now all I need is some chocolate to put in it.
The svg cut files and pdf patterns for this will be in my Etsy shop.
http://www.etsy.com/listing/80572039/school-house-box-svg-cut-file-and-pdf

Thanks for viewing and I hope you enjoyed it.


Wednesday, August 24, 2011

Decorative Oriental Screen


My niece loves Oriental decor. For her birthday I thought I would make a fold out card that looks like a decorative screen. I ended up using vellum for the panels so writing a birthday message on it might not look so great. I decided to just call it a 3D decoration instead of a card...LOL.

I completely made up the scroll decorations for the top and bottom. Don't know if it would actually be considered "Oriental" or not but it looks good so it works for me :)

Of course, it would not be complete without some paper flowers. Here is my version on a cherry blossom.


I shaped these just like I do my "pretty flowers" . (see tab at top of blog just under header)
Yes, I know they are very small...but look how pretty they turned out...so worth it.

It folds up and fits in a letter size envelope.


Oh,  I also made a plain screen in the files that looks like this:
It was one of my first attempts. I like the other one much better :)

I linked this on Passionately Artistic


Sunday, July 3, 2011

Baby shoe for Paper Dolls Challenge


How stinkin' CUTE is this!


It is a baby shoe I made for the Paper Dolls Challenge. The "Dolls" wanted a project with svg's and stamps. I got this idea from something I saw on Splitcoast Stampers. I remember "helping" my grandmother make doll shoes when I was little. I actually still had pattern! (it was written in pencil over 30 years ago!)
I and true to form, I made a cut file for it.
(Sorry I am not sharing this one. I am going to tweak the file and make a boy version then sell the svg/template on my Etsy store. I'll post the pictures of the boy shoe when I get one made...
sooo many crafty ideas and never enough time...LOL)

I wanted to go ahead and post it so I could share and enter it in the Paper Dolls challenge

As for the details...
I cut the the shape out of white cardstock using the svg I made. Then I stamped a Clear Dollar Stamps rose on it and embossed it with pearlized embossing powder. Then I inked it with TH Distress Ink; Victorian Velvet. On the inside, I took the stem from the rose stamp set and stamped "lines" on the inside so it would look like stripes. (you know me and details by now :)


When I made the file, I put a small hole on the strap and another one on the shoe where the strap would line up to it so I could put a brad on for the "buckle".
I decided at the last minute to just put a self-adhesive pearl on.


And of course, I HAD to add a rose!


The instructions for this rose will be on the tabs at the top of my blog sometime tomorrow. I already have a couple of flower instructions up there.

The Paper Dolls challenge will end in a few hours.
(I completely waited until the last minute)
You can always join in on the next challenge. It is such a great site.
Head over there and see for yourself :)

Friday, June 24, 2011

Summer Blog Hop Day 1


You should have arrived here from Janet's Blog (http://ladyluvbug.blogspot.com/)
if so you are on the right path, if not please click on the link http://scrapersdelight.blogspot.com/  to start at the beginning as we'd hate you to miss out any letters.

Here is the line-up just in case you missed a blog.

Martina Brill  http://stampinggoddess-stampalicious.blogspot.com/
Meesh AKA Michelle  http://meeshskraftkorner.blogspot.com/
Rhonda Miller  http://bluepoohbear753.blogspot.com/
Ginger Williams  http://memories-by-gn.blogspot.com/
Giselle Varela  http://crossmyheartpapercrafts.blogspot.com/
Danielle  http://daniecreatief.blogspot.com/
Janell  http://janellscreations.blogspot.com/
Trisha http://trishliciousandco.blogspot.com/
Leslie Krochta  http://www.lesliekcreations.blogspot.com/
Carol  http://www.butterflycardsbycaz.blogspot.com/
Tracy  http://queeniesscrapmad.blogspot.com/
Brandy  http://allthingscrafty-brandy.blogspot.com/
Amber  http://pixiperfectcreations.blogspot.com/
Janet  http://ladyluvbug.blogspot.com/
Jani Lewis  http://papercompulsions.blogspot.com/
Carrie  http://paperglitterstamps.blogspot.com/
Freda Thomas  http://scraparama.blogspot.com/

I hope you are inspired by my project and are enjoying the blog hop so far!
When you are ready please hop over to
Carrie's blog at http://paperglitterstamps.blogspot.com/ and continue the fun.


When I think about summer, I think of picnics.
It seems like no matter were we go during the summer,
the zoo, the park, or camping,
 we are always taking a break during the day to have a meal or even a snack.
And were you have food...

... the ants are sure to come!


Aren't these little guys cute! I just love the little ant with the watermelon :)


I made the cut files, cut them,  and inked the edges, (it comes together really quick)
Then I added some red & white checkered patterned paper and grass.
(You can get the cut files if you are ...or become... a follower of my blog.)
The grass would not cut at exactly 12 inches so I made one long srtip and one short piece that join together.
I added my "loopy tags" and some stictched ribbon and I was done.

I also made this little card.


The cut file comes with the holes for the stitching included. I used red embroidery thread. It does not take but a few minutes to stitch up.

Here are the svg cut files and pdf templates for the ant card.

If you want the whole set of ants and picnic items just:
1) be or become a follower of my blog.

2) leave a comment here with your blog address
or
email me at papercompulsions@gmail.com

I will email you a compressed folder with the svg cut files and pdf templates.

Be sure and check back each day this week to see what fun things I have posted.
I hope you will continue the fun at the other blogs on the list.
(only 2 more to go then back to  to submit your answers to the questions)

My hint to you before you go is that one of the words is a day of the week.

Here is my letter


Your next stop:
Carrie's blog at http://paperglitterstamps.blogspot.com/

Happy Crafting!

Paper Dolls Challenge Week #4 Flip Flops

What a fun challenge this week over at the Paper Dolls Blog! It is challenge #4 and the theme is Flip Flops!
Eleanor of SVG Shop has provided these really fun flip flop boxes.


Aren't these adorable!

I added felt ribbon instead of the paper pieces for the foot.

Then I added some ribbon with beaded trim to the edge of the box lid.


This was so much fun you have to try it out for yourself :)
Head on over to the Paper Dolls Blog in join in on the fun.
You'll FLIP over it!
(sorry, I could not resist :)

Monday, May 23, 2011

Flowers and leaves file, again

Well my crafting friends, I am having all kinds of computer problems. Fortunatly, my son is home from college and can work on it.

If you downloaded the flowers and leaves file from the flower pot post or the twins b-day blop hop post, the file is messed up. I posted it again but that file was also messed. I have redone the file and have it below. Hopefully the 3rd time is a charm :)

Also, I finally got 100 followers! woooo hooo! I had a special project to post in honor of this occasion, but that file got messed up too. It was a box file that I converted from my very first post, birdhouse card.

As soon as I get everything worked out I will post it.

Thanks for following and being patient.


If you have anymore problems with the file, email me at papercompulsions@gmail.com and I will send it to you.

Monday, May 9, 2011

CCCB initial color challenge

City Crafter Challenge Blog has an interesting challenge. It is an initial color challenge. That means color combo where each of the 4 colors starts with the same letter as the blog name. (CCCB) The colors are Cream, Coral, Chartreuse, and Blue. It makes a really fun color palette. I don't normally use a lot of coral or oranges. I have to admit, I need to start incuding it in more projects.


( I promise the cream is really more cream than white in person :)

I used my "open rose" file again for this card. I also cut the "pretty flowers" in cream and inked the edges with Faded Jeans DI. The leaves are my same old files, but the mat is new. I own a Fiskers edge punch that looks like this but it broke a while back. I like the punch so much that I kept trying to use it even though it was broken and kinda' a hassle. Well I finally decided to make a cut file with that trim on the edge of a mat. Hope you like it.

Open rose: SVG    SCAL

Pretty flower: SVG    SCAL (the Branch and leaves are included in this scut file)

Fancy shell scalloped mat: SVG   SCAL

Please look at some of my older posts to get the SVG of the leaves.

Friday, April 22, 2011

Bunny bottoms

How stinking cute is this! I don't even remember what made me think of this. Those are rolled flower rosettes for the tails.
An easel holds the bunnies up.

I had a little trouble getting the rosette in a cut file that I liked. You could always just cut or punch a circle and cut a spiral shape out of the middle. (There are videos on You Tube that show how to make them)

bunny backside cut files:  SVG   SCAL


To assemble this bunny:

Cut out shapes. (There is a full bunny body that is a little smaller than your bunny head and body pieces to make the finished bunny sturdier.)
 Ink bunny head and body if desired.
Fold long side of easel about 1/4 inch and glue folded side to the back of the full bunny cut out.
(I recommend gluing the easel on while the bunny part is standing up so you can adjust it easily and see how you want it to stand.)
Glue bunny body part to full bunny cut out. Next glue the head on top of that.
Make rolled flower and glue onto tail area)

Enjoy your little bunnies!