Saturday, June 30, 2012

Fourth of July Decorations

I made some cute July 4th party decorations. 


You may remember seeing the card files I gave out last year with the star cutouts. Well, I simplified the star cutouts and made these cute rockets.


The rocket sitting down is a treat box that is 4 inches by 2 inches without the lid.


It is about 6inches by 3 inches with the lid. 


I added some cute little curls to give it a little something extra. I put Stickles on them but it does not show up in the picture.

Then I came up with the idea that the rocket could be put on a stick to be added to a party centerpiece  or place in the ground to line the sidewalk.


It is a hollow tube and the cone is glued on top. It would also look great suspended from the ceiling and with streamers hanging from it.

Then looking at the star cutouts made me think of napkin rings.


Then when I was making the napkin rings, I thought they would make adorable bracelets!
(Man, if you give a crafter an idea, she will think of 5 more...LOL)

The backdrop is 2 pieces of scrapbook paper that I bought YEARS ago and have had stashed away just for an occasion like this. (Asky page and a grass page.)  I love how it added some pep to the pictures. :)

The files for these Patriotic Party Decorations are available on my Etsy shop.

I have a lot more ideas for the Fourth' but I don't know if I will get to them all. We will have to see.
Monday, June 25, 2012

Operations Write Home Cards

Well, I finished all my OWH cards and have them ready to mail. I ended up making 25 and only 3 of them were duplicate designs. Don't worry, I am not going to try to show all of them. LOL


Here are a few of my favorites:
The bird is one of my die cuts. I inked it with Peeled Paint adf stamped the SU flourish with Chipped Sapphire.The Swirly Vine is one of Penny Duncan's files.


This card was made with Graphic 45 Tropical Travelogue papers. I added one of Penny's Hibiscus files that I inked with Wild Honey.


This was made from my own files. I used a Lattice Edged Mat and Pretty Flowers and leaves. It is simple, but I like it.


I have been making 5 1/2 by 8 1/2 cards for so long now it was challenging to go back to A2 sized cards. It was good practice though. The other challenge was not making bulky flowers like I usually do. I wanted to stick with designs that would be easy to mail. The funny thing was that I don't use a whole lot of glitter, but once I knew I could not use any, glitter was the one thing that kept popping in my head. LOL


Hope you get inspired to make some cards for OWH to send to our heroes. :)

Friday, June 22, 2012

Pocket watch 2.0

Well, give me long enough and I can think of a dozen different options to most craft projects. Creativity is not my problem...narrowing my focus and editing down is where I have trouble. LOL


With that said, here are the new improved versions of the pocket watch I introduced last week.


I revised the pocket that I made last year for Father's day to hold the pocket watch.


Here is a video showing how to assemble the pocket..
(If you have the files from last year, I changed the holes slightly on this one)


Next, I added a small box to the watch...

It is difficult to see it in the picture above, but you can see it in the middle of the picture below.


Then I added an acetate cover and put the clock face in the bottom of the box.


Then, it dawned on me that the original pocket watch needed a place for a picture.


( yes, that handsome young man is my son)


Here are videos of assembling the box and a few of the options that can be used with these files.


I will be working on a motorcycle cut file to add to the front.
For now, the cut files with the wildlife coverscan be purchased at my Etsy store.

Sunday, June 17, 2012

Wildlife Silhouettes for Dad

June is always a busy month for me card-wise. Besides graduations and weddings, my DH's birthday is in June, followed by Father's Day, and then our wedding anniversary. So I make 3 cards to give my DH in the space of 3 weeks! You can imagine how difficult it is to think of 3 different masculine designs.


Here is what I came up with for his birthday...

Yep, you caught me. Now you see the real reason I made all the animal silhouettes that I featured as decorative covers for the pocket watch. 
(I will be showing more on the pocket watches later this week.)

On the front you can see some of the deer.


I cut them in Core-dinations card stock and tore and sanded the edges.

The bear would not fit on the front, bu I just could not leave him out so he is on the back...


  I would love to tell you the "eye" was intentional, but to be honest, it just happened when I sanded the edges. LOL


I have shown side step cards before. I was using measurements that I found online, but it always bothered me that the side areas did not line up better. I decided to play around with the measurements so that the side panels stair stepped up. Here is what I came up with...


Now I made this up so if you see different directions for a side step card using paper that is
8 1/2 by 11, you will know why mine may be different.

Here is the link to download the instructions and the cut files for the decorative panels. 
If anyone would like PDF templates, just leave a comment.

I will be adding these instructions to the "step card" tab under my blog header.

The animal silhouettes will be available in my Etsy shop.

Friday, June 15, 2012

Tools for Operation Write Home & MTC

Make the Cut is offering an Operation Write Home challenge this week. You can check it out on their forum site or on the MTC FaceBook page.


As you may know, OWH is always in need of cards to send to soldiers who are stationed overseas to use when they write home to their family and friends. So MTC is sponsoring a challenge to make cards to send to our armed forces.


 You can make any type of card. Please keep in mind that OWH prefers that certain guidelines are followed. They prefer A2 sized cards. (4 1/4 by 5 1/2) and NO GLlTTER. 


You can check out more information about OWH guidelines at their site or on this video


I am offering  offered these tool cut files and pegboard card files to go along with this challenge. You can use any or all of them to make a masculine card for OWH.


These files are no longer free. I have  fiiles for both sets of cards below in my Etsy Store.
The cut files include everything to make this card:


Of course, you don't have to make this card. You can use the files however you choose.

Here is another card I made using the tools and pegboard.

It is a stair step card. 


I have folding instructions and cut files for the decorative panels.


I will also add these instructions on the "Step Card" tab under my blog header for future reference.

By the way,
I will be making videos on the step cards and the pocket watch cards as soon as my body feels like cooperating. LOL

I will also add a bike to the decorative covers for the pocket watch as requested. :)

Thursday, June 14, 2012

Pocket Watch

Well, I know I am running late for Father's Day cards. Here is a pocket watch card I made.


You open the first cover to reveal the watch.
Then you open the next cover to reveal the card.


Or you could just write on the side opposite the clock.


One of my favorite parts is the chain I came up with...


The pieces interlock to form a 3D chain.
(you know how I love the details :)

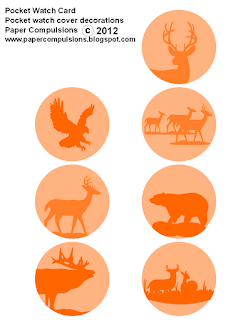
I also made several different animal silhouettes to put on the cover...


ok,ok, I got a little carried away...


...but hey, that's what I do. LOL

I hope to have a video online later today.

I also have a special treat panned for tomorrow.
Be sure and check back.

One more thing...
I added a tab under my blog header for all my crafty friends to post pictures of things you have made using my files. Please feel free to link any and all posts where you showed off your lovely creations!

Thanks 


Friday, June 8, 2012

Lattice Edged Cards

I have more lattice edged cards to share. 


This one has the lattice edge around three sides. I added one of my detailed butterflies and my tattered flower & pretty flower combinations. The butterfly and flower cut files are available in my Etsy shop.


It still needed something else but I knew I could not hide the edges of a ribbon and a bow would be too much. So I gathered some white seam binding in the middle and topped it off with a row of pearls. I showed how to gather the seam binding on this post.


Since you can see the other side of the card through the lattice I added a little ink to the front edges.

When I was making the cross and lattice edged mat for my other card, I made an extra set (well, ok...I made a mistake in my measurements the first time...but hey, why waste good die cuts...LOL)

I added a seam binding flower and added  a pearl.
You can download the free cut files for the cross from  this post.

But I was not through with my lattice edged files.
I had to make a card that had the lattice on both sides of the card.


This one is simple but all that cut work adds a great touch.
All I added was a mat, some patterned paper, and a caption.

You can download the "hello" script caption here.

One more thing to share...
I had to make a box to fit the card I made in the last post.


I used the lattice mat and one of my detailed butterflies to decorated the gift box I made.
I show how to make the box on this video and the cut files for the box can be purchased here.

The entire Lattice Edged Design Package is available here.

Sunday, June 3, 2012

Lattice Cross Card

Hello my crafty friends. I needed to make a card for my aunt to give to her church. I really wanted this card to be special. I had the roses and the cross done a few days ago, but for some reason I just could not figure out how I wanted to arrange them. Just like a lot of my projects, I laid all the pieces to the side of my craft table to look at while I figure out what I want to do next.


Well it worked because I am really happy with the way it turned out. :)


I made a lattice cross design and then later decided to make a lattice edged mat.
You can download the cross here.
I have to go tweak the mat a little.


The roses are from my Regal Rose cut files and inked with Tattered Rose and Worn Lipstick Distress Inks. The leaves are not my typical rose leaves. I decided to use something a little more delicate. (I have included them in several of my flower flies as well as the "just leaves" file.) I did not want to use the normal green inks on this card so I went with a new Seasonal Distress ink that I just bought; Peacock Feathers. I can already tell I am going to LOVE this color!


The ribbon is made from seam binding that I wet with water and then used Worn Lipstick Distress Stain on one half and allowed the ink to bleed/blend toward the other side. It gives a subtle variegated look.


That is it for now. Thanks for looking!


I also have another decorative cross file that I shared on this post.