Friday, December 16, 2016

Dark purple

So my last post was of a light purple card. I took that idea a step further.
This time I went with a darker purple.


I added gold foil accents and heat embossed the edges with gold glitter embossing powder.
For the top panel on the front I used texture paste and gold micro beads. 


I added foil to the back again.
I am really loving the gold and dark purple.


Tuesday, December 6, 2016

Light Purple Card with Roses

 I wanted to make a special card in light purple. 


 I use light purple cardstock for the card base and ran another piece through my printer and then the Minc to add silver foil. The next layer was covered in texture paste then embossing powder was added. I edged the layers in embossing powder also.


I loved the foil so much that I added another panel to the back.


Believe it or not the handmade paper roses started out as white cardstock. I inked and inked and ended up with a color so close to the purple cardstock that I guess I should have just started the roses with colored paper and saved myself some work. LOL


Wednesday, November 30, 2016

Pink roses and lace

After saving my Prima Tales of You and Me patterned paper, I finally decided to use some of it. I made some lovely pink roses and used pearls and lace to finish the card off.


The lace was white but that rather stood out on the cream based patterned paper.  I used Tattered Rose Distress Stain to help it fit in better. I added a piece of stained seam binding over the top.


 I normally use solid colored card bases but I felt like using this lovely patterned paper this time and really liked it.

I am off to make more flowers. 
Hope you have fun crafting.

Sunday, November 6, 2016


Simple card but still so pretty.
 I started with a white cardstock card base and inked it purple. Next I added purple cardstock that had been embossed and rubbed with silver gilding paste. 

I placed a panel in the center that was stamped and heat embossed with silver embossing powder. I finished the card off with my handmade "open flower" and seam ribbon.

Saturday, November 5, 2016

Speak "Birthday" And Enter


We are huge Lord Of The Rings fans. For my son's last birthday, I decided to replicate a scene from the book and movie of a secret door that only shows up in moonlight. I thought holographic foil on a navy blue gatefold card was perfect. The only problem was that I could not find a good image to copy. I ended up recreating the entire image from scratch in Inkscape. (EVEN the elvish writing!) So, despite the fact that this card has no handmade flowers, it still took me an entire week to make. LOL

Friday, November 4, 2016

Stencil and Foil


We are seeing foil accents on more and more things these days. I have used my Minc machine on all sorts of cards. Unfortunately, most of those projects did not get photographed. I will have many more coming soon though. For today's project I took a different route though. I used the Deco Art foil glue and a stencil to add some shiny accents to this card. It was a great way to use up my foil scraps too. I save every little scrap of foil film that I use with my Minc. I found that using them with the glue was the perfect situation. I did not need large areas of unused foil. I just keep laying the foil down in different spots and rubbing until all the glue was covered. I even added some glue to the butterflies and foiled over it once the glue was dry but super tacky.

The paper's used were from All that Glitters from Kaisercraft. 
(I have been trying to actually use all the beautiful patterned paper that I have been hoarding over the years. LOL That is why I have been using so many older paper lines lately. I have barely made a dent in my stash though so this may take a while...
Not a bad situation though :)

Thursday, November 3, 2016

Georgia Peach


One of my nieces hates pink , but she does love peach. She now lives in Georgia so peach is a very fitting color. I turned to some older G45 papers, Le-Romantique Collection - Loves Labyrinth,  that were so pretty with lots of peach. I ran into a problem when trying to match a Distress Ink to the patterned papers. There just was no one color that worked. I decided to use 2 colors instead and got a perfect blend from Tattered Rose and Dried Marigold. Ironically, the Tattered Rose ink is pink which she can not stand. The pink turns a beautiful peach when paired with Dried Marigold. I don't think she will ever guess that pink had to be used to get the beautiful color on these roses. (shhh...it is our secret. LOL)

Tuesday, November 1, 2016

Colorful Butterfly Garden


We all fell in lone with K & Co's Mariposa collection a while back. Scrapadabadoo even bought some extra sets a few months ago. I grabbed some up, but so did everyone else because they are sold out now. Here is a card I made with some of the papers.
I added my handmade flowers and used Tim Holtz Peacock Feathers Distress Ink to add accents. (I just love that color!) The picture does not show all the glittery goodness on the paper but, trust me,  It is there.

Sunday, October 30, 2016

Pretty in Pink Roses


I needed to make a special card for a very special lady. I had some serious health problems this summer. One awesome person gave a lot of emotional support and even offered to physically come help despite the fact that she has her own health problems, We really appreciated her and wanted to send a great card. In fact, my hubby was so grateful that he said the card needed to be the most beautiful card that I had ever made...
NO PRESSURE, RIGHT??? LOL
Well, she loved it so all is well. :)

I used paper from Prima's Tales of you and Me collection. Light pink foil from Heidi Swapp's Minc collection, a wooden butterfly from Prima's Stationer's Desk, my hand made roses, and lots of pearls.   

Saturday, October 29, 2016

Fall Treat Boxes with Windows


I made some cut files for some fun new treat boxes with a Fall theme. There are acorn boxes pictured above, and pumpkin boxes...

Then I made a Maple Leaf box 
 and an Oak Leaf box

The cute Fall papers used were from old collections of Bo Bunny Apple Cider and Enchanted Harvest.

You can see all the different boxes in this video.


The cut files can be purchased here.

Fall treat boxes with windows

Halloween treat boxes

I also have videos showing how to assemble the boxes.


 Small Treat Box Assembly

Large Treat Box Assembly


The boxes are easy to assemble and fun to make.

When the files are cut "as are" and assembled, the small box is approximately 
4 inches high, 3 1/4 inches wide, and 2 inches deep. The large box is about 6 inches
tall, 5 inches wide, and 3 inches deep

Friday, October 28, 2016

Embossing powder on texture paste


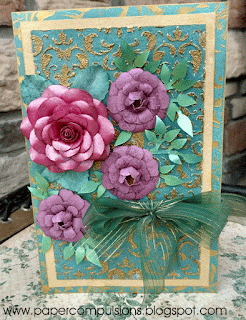
I watched a video where they made a mixed media project using texture paste and putting embossing powder on it. I tried it on the center panel of this card. I applied the texture paste through a Prima damask stencil. then immediately covered the paste in a gold glitter embossing powder. I waited for the paste to dry then used my heat gun to melt the embossing powder. The finished product is very nice. the texture paste adds dimension and a slightly rough texture.  


Believe it or not, that card stock started out as white. I sprayed it with Prima Color Bloom Spray in Deep Teal.

To frame this panel,  I used Inca Gold guilder's paste i gold for the gold frame the stenciled with the same gold guilder's paste on another sheet of Deep Teal sprayed cardstock.

It was a lovely backdrop for my handmade flowers. The rose was colored in Inca Gold Violet and the other flowers were sprayed with Prima Color Bloom Berry Wine.

Saturday, April 9, 2016

Beading Obsessions

I have started another blog for my new beading obsession.
I figured that since I have "compulsions" to do paper projects then 
"obsessions" for beading would be fitting. LOL

So hop on over to Beading Obsessions to check out my projects.
(Of course, I will continue to post paper crafts here on this blog.)   :)


I'm still here :)

Wow! It has been a LONG time since I blogged. 
I have been crafting but just not blogging about it. I guess I just needed break from the work that it takes. Well, I am rested up and ready to dust off my keyboard and share more crafty goodness.

Here is a step card that I made a while back with lots of cool foil using my Minc.

I made a birthday cake and put some handmade paper roses on it,


I used my Heidi Swapp Minc machine and pink foil to write "Happy Birthday"

 The picture just can't show how pretty the foil is in person.


Well,
more paper projects to come soon.

I even have some beading projects to share too.