Showing posts with label Scrapadabadoo. Show all posts

Friday, March 6, 2015

2nd Group of Heart Cards


Heart Card #4


Here is a video.


Heart Card #5


Here is a video.


This is a close up of the strip that I cut out from a 3 by 4 card and added.


Heart Card #6


You can download all 12 card measurements and templates.

Monday, March 2, 2015

Cards with Heart(s)

Wow, sorry for not posting in so long. The good news is that I have felt better and been able to do more and go a few places. The bad news is that I have neglected my blog. I have been crafting though. It will take me a while to get caught up with all the pictures. That just means you all get to see lots of posts in the next few weeks. :)

So let me start with some cards that I planned to be for Valentine's but would still be good for several other occasions such as love, Mother's Day, or weddings.

All the cards were made using the Authentique Classique Pretty paper collection from Scrapadabadoo.

 Heart Card 1

Here is a breakdown of how I made this card.
You can download the pdf page here.

 Heart Card 2


Here is a video showing how this card was put together.


 Heart Card 3

Same idea, but the different papers give you such different looks.


Here is a video.


Well I hope you have enjoyed these cards.
There are 12 heart cards in all.
You can download all the measurements/instructions and templates.


I will be posting more videos during the week.
(after all, I really have to get caught up. LOL)

Saturday, September 6, 2014

Scrapadabadoo Blog post Mica Flakes and LSG Sprays

Hello, I hope you are doing well today.
I have posted the details and a video showing this card on the Scrapadabadoo Blog today.
The cut file and pattern for the elk is available in my Etsy shop. The elk is part of a Wildlife set here.
Head over to the Scrapadabadoo Blog to find out more.


Monday, August 11, 2014

Happy Challenge from Scrapadabadoo Crafts FB Page


There is a fun sketch challenge over on the Scrapadabadoo Crafts FaceBook page.
The challenges are just for fun and change every two weeks. (That gives me time to think of a project and actually get something made. LOL)

I used some leftover papers and embellishments from the Teresa Collins You Are My Happy line. The background papers are from one sheet in the 6 by 6 pad. That black and white striped piece is really the decorative strip from the top that usually gets cut off. The white paper with the hearts is just the other side of those fun scalloped layers.

The striped flag and the adorable elephant flag were already made and came in one of the embellishment packets. I made the third flag with a sticker that I trimmed down and a toothpick. The only toothpicks we had were colored so I just painted all the picks black.


That heart brad is just too cute!
The card came together really easily and is now ready to send a cheerful hello to a friend.

The Teresa Collins You are My Happy is on sale right now at

Feel free to drop by the 
and check it out.

Thursday, July 24, 2014

Glittered Backgrounds and Vellum Flowers

I have some lovely vellum flowers to show you along with some beautiful glittered backgrounds.


First, pop over to the Scrapadabadoo Blog 
to watch the video on how to do these
awesome glittered backgrounds using
glitter, stencils, and adhesive backed paper.


Now, for the vellum flowers.
They are very easy to make and you will get stunning results.


I have used vellum and the Tim Holtz Tattered Florals die for these.

This first video shows how to color the vellum and how to make the large flower. 


The second video shows how to make the daisy type medium flower and the smaller  yellow flowers.


www.youtube.com/watch?v=eath_cqarRI

I hope you feel inspired to make some vellum flowers and glittered backgrounds.
Be sure and post your creations on the Scrapadabadoo FaceBook page so everyone to see. Remember, the only requirement is to have fun crafting:) 

Supply links
LSG Sprays used
Glass beads -white and black set
Vellum

Wednesday, July 16, 2014

Encrusted Rose on Scrapadabadoo Blog


I am in love with this card. In love with the roses.
I used the  Frantage Encrusted Jewel set from Stampabilities to emboss the backgrounds on the card and tag. Then I added the glass glitter from the kit on the tag and butterfly. Which are awesome. But it is the roses that are the most stunning.


Hop on over to the Scrapadabadoo blog for more details and a tutorial.

Thursday, June 26, 2014

Scrapadabadoo Sizzling Summer Blog Hop

Welcome to the
Scrapadabadoo
If you are just coming across the hop, you will want to go to the
Scrapadabadoo Blog and start from the very beginning.

My bike was a project that just sort of grew as time went on.
Ever heard Leonardo da Vinci's quote,
"Art is never finished, only abandoned"
Well either that is the case or else I "just don't know when to leave well enough alone."
( I will let you be the judge.) LOL

I knew I wanted to use the Prima Stationer's Desk paper pack
because it was my favorite at the time I started working on this.
(my hubby claims I pick a new favorite every time I see a new paper line. LOL)


Of course I knew I wanted to make several handmade paper roses.
They were cut from white cardstock using my own cut file and digital cutting machine.

Next I decided to stain some ivory trim using Aged Mahogany stain.
Then I got the idea of using teal colored seam binding behind it for more contrast and color. I used TH Peacock Feathers distress stain for that. 
(I have an old video on how to color seam binding here.)
I used 2 rows of the seam binding on the top and bottom then covered them with the decorative trim.
I happened to have some Swarovski crystals in my stash that where the perfect colors.
I hotfixed them on.


I lined the inside and outside of the big wheel frame with the Stationer's Desk paper which added color and gave me something to glue the other embellishments onto.
I added paper to the back and "precision" cut some of the roses from the paper line.
The fussy cut sections were layered into the frame.
The top area needed something.
If you know me, butterflies are usually my answer. LOL

I used a really old paper punch and some of the Prima cloth covered wire to allow my little butterflies to flitter about.
Of course they had to had a little Diamond Stickles. :)


Next I added one of my Detailed Butterflies that I cut from white cardstock and colored with Aged Mahogany and Autumn Maple Crimson. The added some touches of Stickels.


Since I had the wire out I got a good idea to wrap the handles and body of the Penny Farthing. At least it sounded like a good idea until I realised how long it would take. LOL

 
(if I had taken the bike off the base like Debi did,
the wire wrapping would not have been as difficult. LOL)


Then the bike sat on my desk for a while.
It just did not quite seem finished to me.

It finally dawned on me that it needed an adorable little bird to sit on the seat.
So I got out the Air dried clay and ivory Flower Soft 
I used the same colors that I mentioned for the seam binding and trim. 
(There is a new video on the Scrapadabadoo Crafts YT
channel on how to color Flower Soft.)

I just love this little guy!

Thanks so much for visiting my blog!

Be sure to follow along with the blog hop and collect all the secret letters.
Once you collect all 11 letters you can unscramble them to form 2 words.
Email your answer to scrapadabadoo@comcast.net
June 27th to July 1.

Scrapadabadoo will be giving away a Prima Bike frame to one lucky winner
and 2 more lucky winners will receive a $20 gift card to Scrapadabadoo!


You can always purchase your own Prima bike at this link Prima Bike Frame .

Your next stop is
Zandra  http://www.scrapstobeautybyzandra.blogspot.com/ 

Friday, June 20, 2014

Upcoming Blog Hop

Hello crafty friends.

I have some exciting news.
Scrapadabadoo has a 
Blog Hop coming up!


It will be a 6 day event with
2 blog posts revealed each day
from Sunday, June 22 to Friday, June 27.

I know it is going to be really fun.
There will even be a prize.
Collect the secret letters from each post then
leave a comment on the Scrapadabadoo Blog on the 27th.

Lots of good things coming up.
I am so excited!


Wednesday, June 18, 2014

Yay! Summer


Well, it looks like Summer may actually come after all. It was such a crazy Winter and Spring that I was beginning to wonder if Summer would make it or not.

The fun colors in the Bo Bunny Lemonade Stand paper line reflect the excitement of summer activities to come.

The dark navy cardbase is A2 sized. Then there is a layer of white cardstock cut at 5 1/4 by 4 inches. Next is a green layer cut from the Lemonade Stand 6 by 6 pad. It is cut at 3 7/8 by 5 1/8 inches. Next is the red Double Dot layer that is 3 by 4 1/2 inches. (Scrapadabadoo has the Bo Bunny Double Dot papers that match the Lemonade Stand line in a convenient cardstock paper pack) The "Yay Summer" sign with it's colorful background is from the cut apart sheet that comes in the 12 by 12 papers. The ticket sticker border is included too. There was a cute little flower on the cut apart tag but since this card is going to an 11 year old boy I thought I would cover it up. LOL The chipboard star from the button pack worked perfectly. 

The card sketch for this Scrapadabadoo Crafts FB challenge
includes a banner. I used twine and pieces cut from the 6 by 6 
paper pad to make the two banners on my card. 

There is a banner in the embellishment pack that is ready to be used but I already have big plans for it. LOL


This Lemonade Stand collection is so fun! If you want to get a good look at it, check out this video where I show it off.
  

Saturday, June 14, 2014

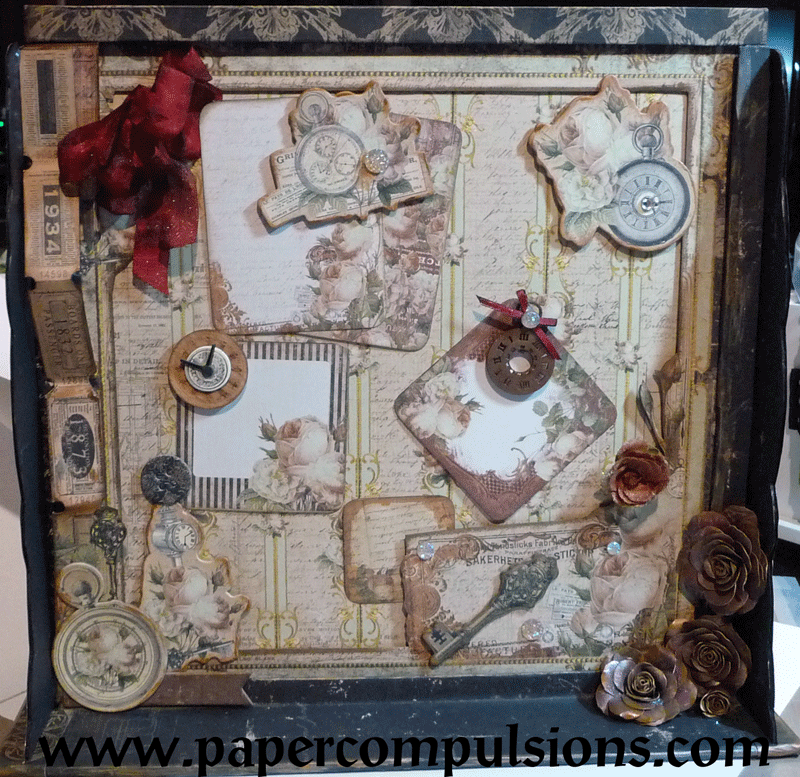
Memo Board Instructions

Hello crafty friends!
Remember the Time Traveler Memo Board I did for the Scrapadabadoo Crafts Ustream Event?


There is a magnetic memo board on one side.


And a magnetic dry erase calendar on the other side.

I even covered the dry erase marker in paper. LOL


I FINALLY got the instruction manual and templates finished! (yay me...LOL)
I took forever just because I am slow when I am hurting. But, hey they are here. :) 
I thought I might feel up to streaming again to show the project but have not been up to it yet. 

You can see a video where I show the project here.

There are a couple of things I should explain about the files.


  • They are in a compressed folder to make it easier to download. You will need to download it, then click on the folder and choose "extract all files" in order to open the files the first time. You only need to do this once. Your computer will save the files for you and from then on you will just go to the folder where you saved the files

  • The templates come in a separate folder from the Assembly Guide to insure more accurate measurements. They are also easier to print this way. 


These are just examples.


The
Assembly Guide comes in 2 forms. 

     1) a PDF instruction manual that contains working links and allows you to scroll
     from page to page. However, some of the images and print comes out blurry in
     this format.

    2) Individual PDF sheets. You will have to open each page separately but the
    images and print are much clearer.

(I suggest you start with the first version and if you come across some thing you would like to have a better image of you can switch to the individual pages. NOTE: the page numbers do not all match up between the 2 copies)

So here is the link to download all the files for the Time Traveler Memo Board/ Calendar.

I tried to make the instructions as easy as possible with lots of pictures and cutting guides.

Enjoy!